


Restoring Deleted Files from Git
Git is a great way to track and control the development of any type of software project, but issues like accidentally deleted files can quickly make for major headaches in your workflow. Thankfully, Git offers some simple solutions that you can use whenever you need to. We'll describe the details involved in bringing missing files back from the grave in this article and touch on how you can do this. You'll have no problem being able to git restore deleted files using the information covered below.
Git restore deleted files with 3 different methods
Deleted files may be a troubling issue to come across in your repository, but they can thankfully be restored using any one of three different methods. The method you choose to work with depends mainly on the tools you have at your disposal. For instance, there's a method that might be better for those using GitHub, but it isn't an option for those who aren't. Similarly, a command-line-based approach can't always be used either. Choosing the perfect file restoration process comes down to working with whatever combination of IT infrastructure and tooling you currently have.
Here are the three methods you should consider using when your project's files go missing:
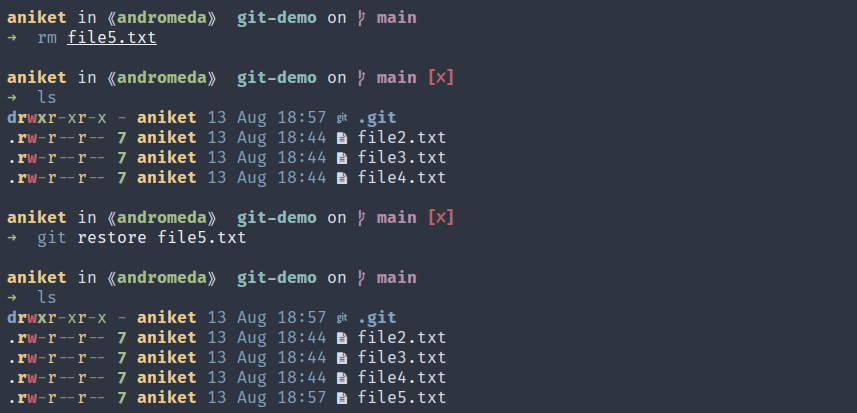
1. Using the Git command line
In Git, there are multiple ways to restore lost files. Each option can be handled via a special command, but the exact option you should use depends on the state that your project is in when you first realize a file needs to be restored. If your code changes have not been staged yet, then you can use git restore, whereas" `it checkout` will be necessary if changes have been committed. Changes that fall in between these two extremes—i.e, you've staged them but haven't yet committed them—must be handled with a slightly modified "git restore" operation instead. Here is what you should do for each scenario:
- If your changes have not been staged or committed: The command you should use in this scenario is
git restore FILENAME.HERE; - If your changes have been staged, but not committed: You should use the command
git restore --staged --worktree FILENAME.HERE; - If your changes have been committed: You will need to use the command
git checkout DELETION-COMMIT-CHECKSUM-HERE^ FILENAME.HERE. The checkout command is more commonly employed to switch between branches in a given repository. However, this command can also be used to bring missing files in your working tree back to life, though the process itself for doing so is not without its own complexities. This approach is a bit more involved than the two previous ones in that you first have to figure out the hash value of the commit in which the file in question was deleted before you can run the restoration command. This means you'll need to resort to navigating across your project's list of revisions to sleuth out the right commit and restore your file from it.
To start, you should first use git rev-list command. This command is meant to return a simple list of all commit objects in reverse chronological order. The trick to using it correctly is to specify which commit git should retrace its steps from and limit its returns to just one, while also providing the file in question as a document that must have been touched by a given commit for it to be returned. This can all be done by adding to the rev-list command so that it becomes: git rev-list HEAD -n 1 -- FILENAME.HERE. This command will get you the commit in which the file is no longer available. The commit preceding this one is the one you're after—the one in which the file is still present. The git checkout command above uses the ^ character at the end of the hash to pull the commit prior to the one specified and make the full file restoration progress smoothly.
2. Using GitHub's web and app UI
GitHub offers its own file restoration options in its web user interface as well as its dedicated app. The rules are largely the same for restoring files as they would be if you were working with Git directly, meaning changes that have yet to be staged can be restored quickly. Simply right-click on the unwanted change to your repository in the staging area and eliminate it. For committed file deletions, you'll need to jump back to Git on the command line and resort to using "git rev-list" to find the commit you're after. However, you will also need to use "git show" on the appropriate hash to figure out what the commit's actual name is. This name can then be found in GitHub's app UI and its changes reverted.
To restore a file using GitHub's web UI, you can actually visit the following URL (after replacing placeholders with appropriate information) and download it directly:
https://github.com/USERNAME/REPO-NAME/commits/DELETION-COMMIT-CHECKSUM-HERE^
3. Using a full-scale backup
Arguably, the simplest approach to mitigating missing file situations in Git would be to simply restore them from a backup. This can be done with third-party tools and leveraged whenever disaster strikes.

However, many would agree that prevention can be far better than a cure. Improving the development process can go a long way toward keeping files from accidentally disappearing in the first place.
Give Mergify a try 🥰
Mergify makes managing your repository a piece of cake. More importantly, Mergify keeps issues from arising at all by automating the tedious tasks that encourage careless mistakes to be made. Accidental file deletions are often the product of bad merging techniques, thoughtless force pushes, and other avoidable mishaps. With Mergify, you can make these problems disappear through automation. Get started today!

