Using Git Reflog to Find a Lost Commit


Handling commits and branches is at the core of a developer’s efforts when they use Git as a version control system. Whether you’re working locally and preserving changes for later inclusion in another branch via a merge or managing a remote repository with many different contributors, the need to keep close tabs on all of the things that are done to your codebase remains. Git's reflog command helps fulfill that need for those who are familiar with it and Git in general. It does so by navigating (and potentially modifying) all of the changes Git has tracked as they happened and saved references to for later use. Should anything go awry, it’s this logged trail of alteration records that makes recovery a possibility.
Git reflog may be a powerful command, but it’s only useful to those who understand it. Before trying to use the reflog command, you should understand its subcommands in some detail and have a good grasp of what it is actually meant to do.
What is Git reflog?
Git reflog is a pretty powerful command to have in your arsenal, but to understand it fully, you should first understand what a "reflog" actually is.
Reflogs are reference logs—records that Git keeps of branch and HEAD modifications that have taken place in your project's local repository. These reference logs are stored as files within your repository in the .git/logs/ directory where each new line actually represents a change in the reference pointer. Each line of each reference file describes a type of change that has been made using the following format:
(starting hash of the commit) (hash of the new commit) (additional info) (type of change) (description of the commit)
Commits, merges, branches and checkouts show up as types of changes in the logs. When you use the git reflog command, you can interact with these records as needed.
How Git reflog works
Reflog is great if you know how to use it correctly. Using the reflog command involves selecting the most appropriate of its four subcommands for your needs.
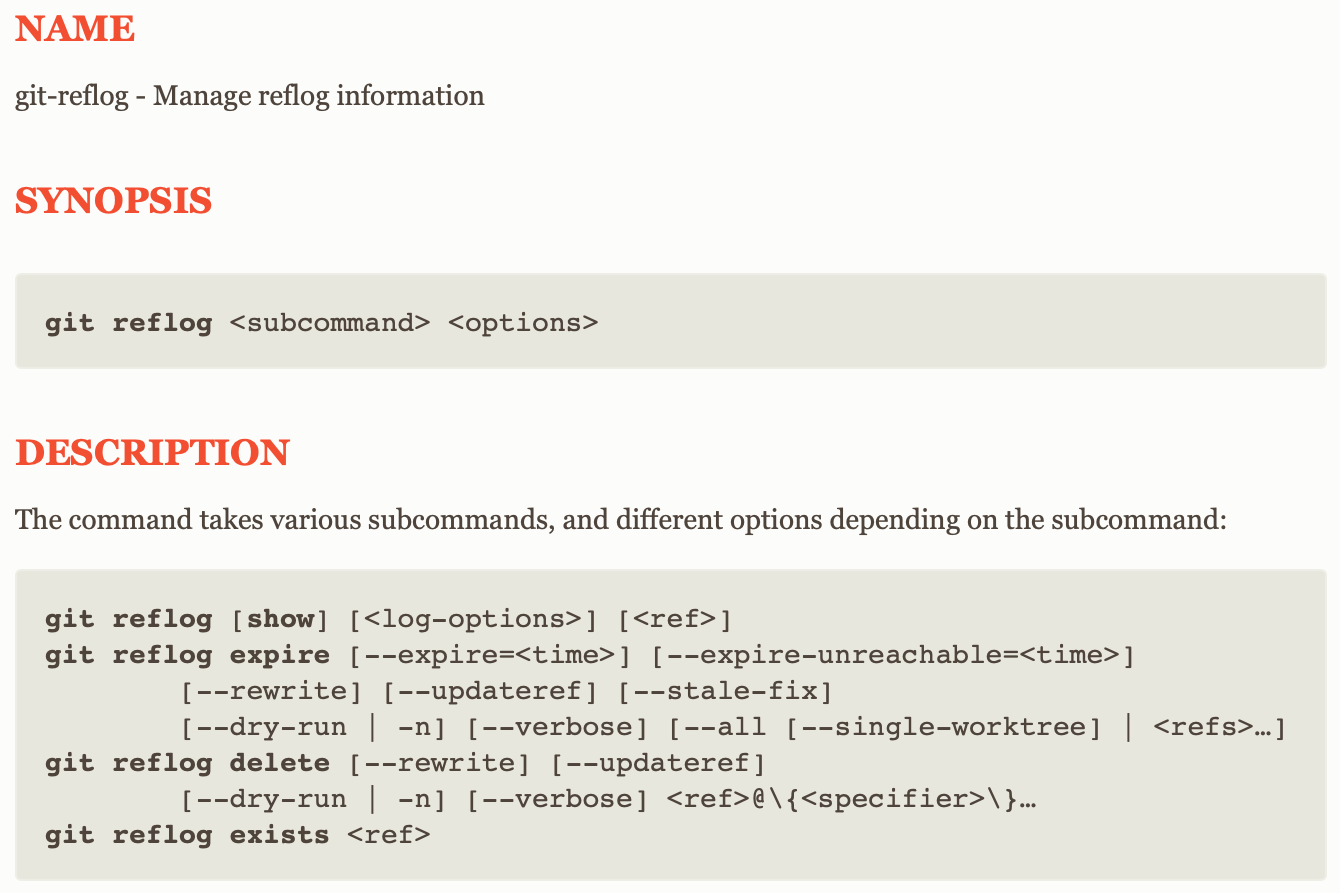
The subcommands that are available for use with reflog include:
- Show: The default subcommand for git reflog is
show, which presents users with the log associated with the specified reference (whatever reference you pass to the command). This subcommand automatically displays the log of theHEADif no specific reference is passed to it. Theshowsubcommand is essentially a mirror of thelogcommand—it even accepts all of the same options. However, by default, reflog'sshowtraverses reflog entries from most recent to older, whilelogmust be passed the-gparameter to accomplish the same. - Expire:
expireis used as a reflog subcommand for when you need to remove reflog entries that are no longer useful to your project on account of simply being too old (they are older than the time you pass in the command or older than the expiration time specified in your project's configuration). - Delete: This subcommand helps remove reflog entries one at a time. Only exact entries can be targeted by this subcommand, as opposed to "expire," which intuitively chooses reflog entries to remove as needed.
- Exists: By using the
existssubcommand, you can quickly determine whether or not a reference has its own reflog.
Finding a lost commit with Git reflog
If you make a change of any kind to a branch, you can expect it to be given a reference log that can subsequently be looked up and reverted to. You can regress to any commit this way, even those with no reference from an existing branch or tag. This is especially useful when you have rewritten history in your local repository and accidentally erased commits that you wanted to keep in place.

Using the git reflog command should reveal Git's internal diary of all of the commits that HEAD has pointed to in your local repository—even the ones you thought were lost forever (assuming they weren’t old enough to have expired).
The hash ID at the start of each line for each reflog entry returned by the previous command is what you should pay attention to at this point. Once you have identified the commit you'd like to resurrect, you can select its hash ID and proceed to either run git reset --hard YOUR-HASH-ID with it or create an entirely new branch with git branch YOUR-NEW-BRANCH-NAME YOUR-HASH-ID to hold the desired state of your repository.
Mend your merging woes with Mergify 🥰
Complex merging operations and tricky commits can cause all kinds of trouble for your repositories without proper planning. Even with a great plan, mistakes can (and often will) happen. One way to mitigate the risks is by taking advantage of automation, and Mergify might just have the solution you're looking for. With Mergify, you can count on automatic merges, review assignments, merge queueing, and more. You define the rules, and Mergify makes it all work—without all of the manual intervention that often leads to trouble. Give Mergify a try today to find out how else it can help your team be more productive.