A Guide to the Pull Request GitHub Workflow

At its heart, a pull request on GitHub is a formal way to propose merging a set of code changes from one branch into another. Think of it as the central hub for team collaboration, a dedicated space where developers can review, discuss, and sign off on new code before it ever touches the main project.
Decoding the GitHub Pull Request
Let's use an analogy. Imagine you and your team are co-authoring a book. Instead of everyone frantically editing the master document at once—which would be chaos—each person works on their chapter in a separate copy. When a chapter is finished, you don't just paste it into the main draft. Instead, you present your changes to the team, showing them exactly what you've added or revised.
That proposal? That's your pull request.
In the world of software, the "book" is your codebase, and your "copy" is a separate branch. A pull request (often shortened to PR) is your way of asking the project maintainers to pull your changes from your branch and merge them into the main, or master, branch. But it's more than just a request; it's the start of a critical conversation.
The Core of Collaboration
A pull request isn't just a technical step; it's the very foundation of modern, collaborative software development. It neatly bundles your code changes with a clear explanation of why you made them. This level of transparency is absolutely essential for keeping the team aligned and maintaining high code quality.
Inside a PR, your teammates can:
- Review Your Code: They can look at every single line you've changed to make sure it meets the project's standards.
- Leave Comments: If they spot a potential bug or have a suggestion, they can leave comments directly on specific lines of code.
- Suggest Improvements: Reviewers might propose different ways to write a piece of code, sparking discussions that lead to better, more elegant solutions.
- Trigger Automated Checks: Most modern workflows hook pull requests into automated testing and quality checks (CI/CD). These checks run automatically to confirm your changes don't break anything.
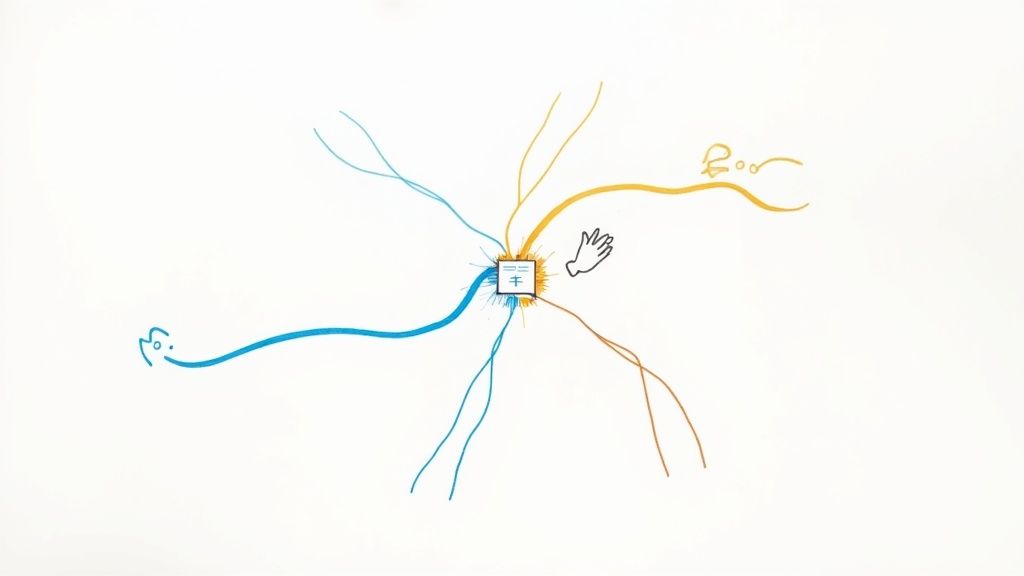
This image shows the fundamental flow: a new feature branch is created from the main line of work, and when the work is done, it proposes a merge back through a pull request.
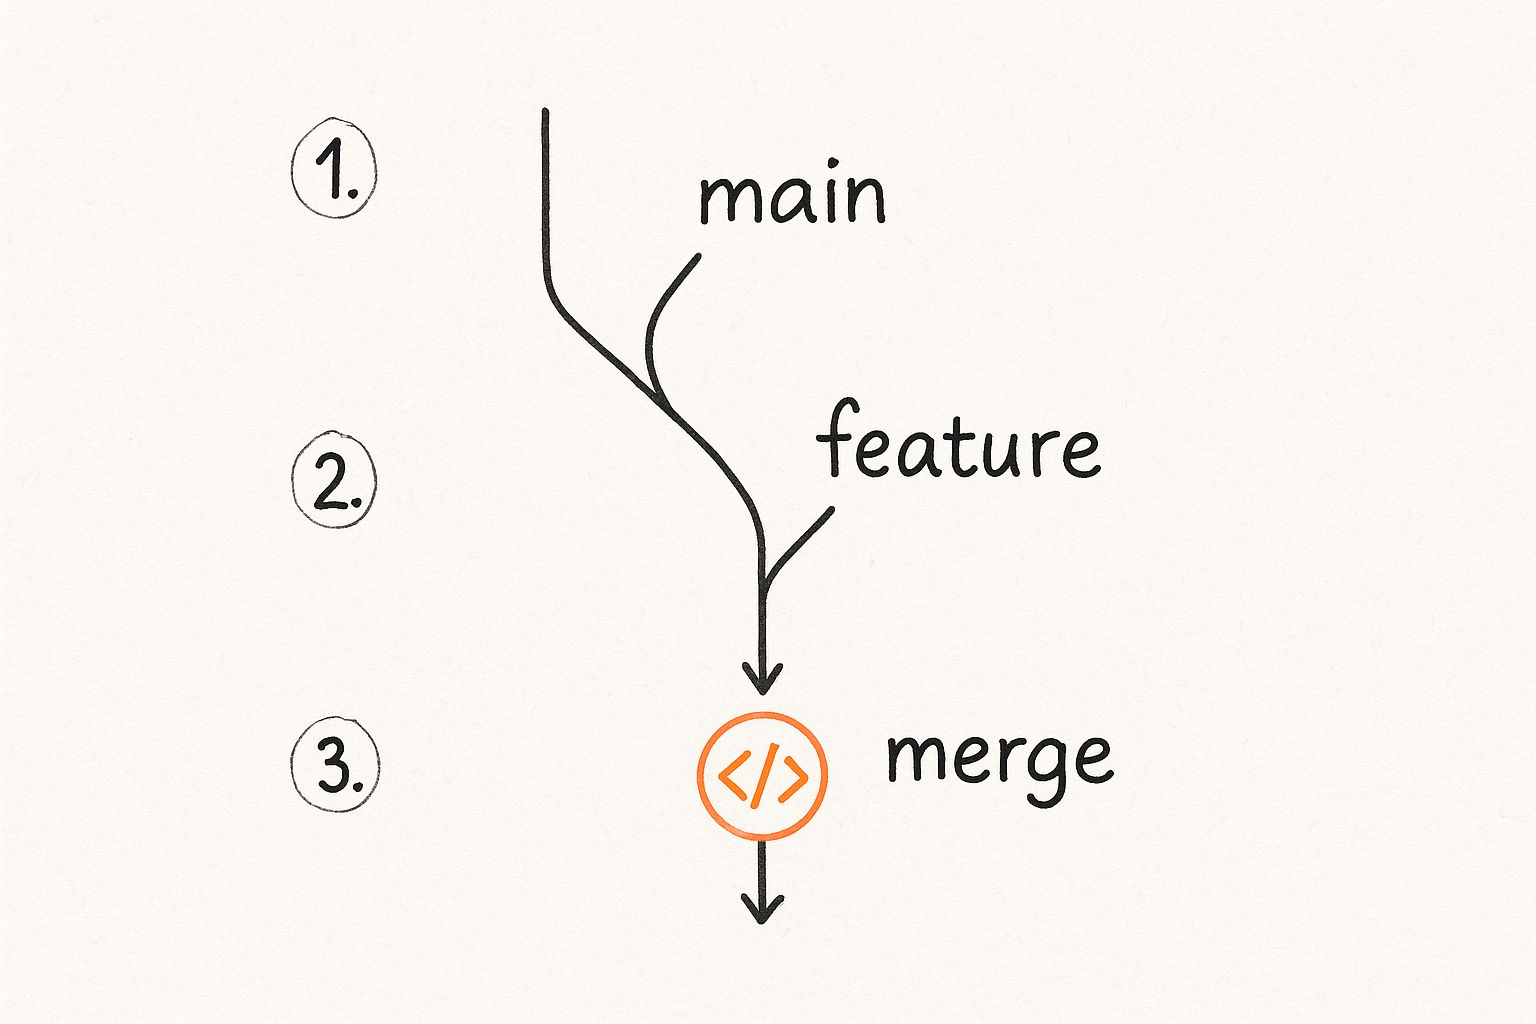
As you can see, the pull request acts as a crucial checkpoint. It’s where isolated work is thoroughly vetted by the team before it gets integrated back into the main project, ensuring everything stays stable. For teams looking to supercharge this process, learning how to connect Jira to GitHub can make a world of difference in managing tasks and PRs.
The Anatomy of a GitHub Pull Request Workflow
To get a clearer picture, let's break down the typical lifecycle of a pull request into its key stages. From the first line of code to the final merge, each step has a distinct purpose in ensuring quality and collaboration.
Here’s a high-level look at how it all comes together:
| Stage | Action | Purpose |
|---|---|---|
| 1. Create a Branch | A developer creates a new branch from the main codebase. | To work on a new feature or bug fix in isolation without affecting the stable main branch. |
| 2. Make Changes | The developer writes and commits code changes to the new branch. | To implement the required feature, fix, or improvement. |
| 3. Open a Pull Request | The developer opens a PR to merge their branch into the main branch. |
To formally propose the changes and kick off the review process with the team. |
| 4. Review and Discuss | Team members review the code, add comments, and suggest changes. | To collaboratively improve the code, catch bugs, and ensure it meets project standards. |
| 5. Revise and Push | The author addresses feedback by making further commits to their branch. | To refine the code based on the team's input, automatically updating the PR. |
| 6. Merge the PR | Once approved, a project maintainer merges the pull request. | To integrate the new, approved code into the main codebase, making it part of the project. |
This six-stage flow turns what could be a messy process into a structured, transparent, and collaborative system that consistently produces better code.
Key Roles in the Pull Request Lifecycle
Every PR has a cast of characters working together. Knowing who’s who helps the entire process run more smoothly.
A pull request initiates a conversation around a set of changes, transforming code review from a simple inspection into a collaborative workshop. It's where individual contributions are refined by team wisdom before becoming a permanent part of the project's history.
- The Author: This is the developer who wrote the code and opened the pull request. Their job is to clearly explain the changes and respond to any feedback from the reviewers.
- The Reviewers: These are the teammates tasked with inspecting the code. They provide constructive feedback, hunt for potential bugs, and make sure the changes align with the project’s goals and coding standards.
- The Repository: This is the central home for the project on GitHub where all the code lives. It’s the “owner” of the
mainbranch and the final destination for the merged code.
Together, these roles create a powerful system of checks and balances that not only boosts code quality but also fosters a strong sense of shared ownership over the project.
How to Create the Perfect Pull Request
Crafting a pull request that your team actually wants to review is a genuine skill. A great pull request on GitHub is far more than just a bundle of code. It's a well-told story, a clear proposal designed for quick understanding and even quicker approval. It makes it easy for reviewers to follow your logic, give meaningful feedback, and confidently merge your work, speeding up the whole development cycle.
The real work starts long before you hit that "Create pull request" button. It begins with your local development workflow. Clean, organized work on your machine translates directly into a clear pull request that respects your teammates' time.
Laying the Foundation with Atomic Commits
Before you can propose your changes, you have to make them. The best way to do this is on a dedicated feature branch. This keeps your experiments and new code isolated from the main codebase, preventing nasty conflicts and keeping things stable while you work your magic.
As you code, get into the habit of making atomic commits.
Think of an atomic commit as a single, complete thought. It's one small, self-contained logical change. Instead of lumping everything into one massive commit with a vague message like "Updated user profile page," you break it down into its core components:
- Commit 1: Add user avatar component to the profile view.
- Commit 2: Implement logic to fetch and display user bio.
- Commit 3: Refactor the profile CSS for better mobile responsiveness.
This approach makes your code infinitely easier to review. If a reviewer spots an issue, they can trace it back to a tiny, specific change. It also builds a clean, readable history that practically documents the project's evolution for you. Don't skimp on those commit messages—they're the headlines for each step of your work.
Writing a Title and Description That Tells a Story
When you're finally ready to open the pull request on GitHub, remember that the title and description are the first things your reviewers will see. They set the stage for everything. A lazy title can create confusion and bring the review process to a screeching halt.
The goal of a pull request description is to provide the context your reviewers need. Explain the "why" behind your changes, not just the "what." The code shows what you did; the description explains why it was necessary.
Your title needs to be concise but descriptive, summarizing the entire change in one line. For example, ditch "Bug fix" and go for something like "Fix user logout error for expired sessions." It's immediately clear what's happening.
The description is where you fill in the details. A truly great PR description often includes:
- A link to the relevant issue: This is non-negotiable. Connecting your code to the original task or bug report provides invaluable context.
- A summary of the changes: Give a high-level overview of what you accomplished.
- The motivation: Why was this change necessary? What problem are you solving for the user or the system?
- Screenshots or GIFs: If you touched the UI, a picture is worth a thousand words. A quick before-and-after visual is incredibly helpful.
Completing the Pull Request with Key Details
With the core story in place, the last step is adding the finishing touches that make the review process frictionless. This is where you use GitHub's own tools to organize the conversation and get the right eyes on your code.
- Requesting Reviewers: Don't just hope someone stumbles upon your PR. Explicitly request reviews from teammates using the "Reviewers" sidebar. Tag people who have context on the code you’ve changed or who you know will give solid feedback.
- Applying Labels: Use labels like
bug,enhancement,documentation, orneeds-reviewto categorize the PR. This helps everyone understand its purpose at a glance and makes your team's board much easier to filter and manage. - Draft Pull Requests: If your work is still in progress but you'd like some early feedback, open it as a Draft Pull Request. This is the universal signal that your code isn't ready for merging but is open for comments and discussion.
By following these steps, you transform a simple code submission into a comprehensive package that’s easy to digest. To take your skills even further, check out our deeper guide on pull request best practices.
The Art of Constructive Code Review
A pull request on GitHub is where individual work meets team wisdom. Its success really hinges on the quality of the conversation that follows, turning a simple code submission into a collaborative workshop. How feedback is given and received determines whether this process elevates the code or just creates friction. The goal should never be to gatekeep, but to work together to improve the entire codebase.
Think of it as a two-way street. It requires empathy and clear communication from both sides. For reviewers, the task is to offer insights that empower the author, not just criticize them. For authors, the challenge is to receive that feedback with an open mind, seeing it as a path to a better solution rather than a judgment of their skills.
Providing Feedback as a Reviewer
Effective code review is a delicate balance. Your role is to be a supportive partner, helping your teammate produce the best work possible. This means your feedback has to be constructive, specific, and delivered with a positive tone.
A great review often combines different levels of feedback. It’s not just about catching typos or syntax errors; it’s about making sure the change aligns with the project’s larger goals.
The most impactful code reviews are phrased as questions or suggestions, not commands. Instead of saying, "This is inefficient," try asking, "Have you considered an alternative approach here? I’m thinking this one might cause performance issues under heavy load." This simple shift opens a dialogue rather than shutting one down.
When reviewing a pull request on GitHub, here's what to focus on:
- The Big Picture: Does the change actually solve the intended problem? Does it fit with the architectural vision of the project? It's best to start here before you dive into the nitty-gritty details.
- Clarity and Simplicity: Is the code easy to understand? Will a new developer be able to follow the logic six months from now? Suggesting clearer variable names or breaking down complex functions can be invaluable.
- Potential Side Effects: Always think about how these changes might impact other parts of the system. Could this fix accidentally introduce a bug somewhere else?
Using GitHub Features for Better Reviews
GitHub gives you some powerful tools to make your feedback more precise and actionable. Instead of just describing a change, you can show it directly.
The "Suggest a change" feature is your best friend here. When you spot a small error or have a better way to phrase a line of code, you can propose the edit directly in your comment. The author can then accept your suggestion with a single click, which dramatically speeds up the revision process for those minor tweaks.
For more complex feedback, it's often a good idea to check out the pull request branch locally. This lets you run the code, test it thoroughly, and fully understand its implications before you offer your thoughts.
Receiving Feedback as an Author
Getting feedback on your own work can be tough, but it's one of the fastest ways to grow as a developer. The key is to approach the review process with curiosity and a willingness to learn, not defensiveness.
Remember, your teammates are on your side. Their goal is to help you and the project succeed. When you receive a comment, take a moment to really understand the reviewer's perspective before you fire off a response.
Here’s a good way to handle feedback constructively:
- Acknowledge and Appreciate: A simple "Thanks for the feedback!" or "Good catch, I didn't think of that" goes a long way. It helps foster a positive, collaborative environment.
- Ask for Clarification: If you don't understand a suggestion, just ask for more details. A comment like, "Can you explain what you mean by 'clean this up'?" is perfectly reasonable and helps you make the right change.
- Explain Your Rationale: If you made a specific choice for a reason, explain it. This can lead to a productive discussion where you either convince the reviewer or they help you see a better way.
- Embrace the Changes: Ultimately, the goal is to improve the code. Integrate the feedback, push your updates, and let your reviewers know the changes are ready for another look.
This collaborative cycle of feedback and revision is what makes the pull request GitHub workflow so powerful. It ensures every change is vetted by multiple people, leading to higher-quality, more resilient software.
Once your pull request gets the thumbs-up from reviewers and all the automated checks have passed, you’re at the final step: getting your code into the main branch. This isn't just a technicality. The way you merge a pull request on GitHub has a huge impact on your project's history. It’s a strategic choice that shapes how your team will understand the evolution of the codebase for years to come.
The method you pick determines what your Git history will look like. Do you want a detailed, branching story that shows every single step of the journey? Or would you prefer a clean, linear narrative that’s easy to read at a glance? There’s no single "best" option here—the right choice comes down to your team's workflow and what you value most.
Let's break down the three main strategies you'll find in a typical GitHub setup.
The Standard Merge Commit
The default option on GitHub is the classic merge, sometimes called a "true merge." This approach takes all the commits from your feature branch and joins them to the main branch using a special merge commit. This new commit is unique because it has two parents: the latest state of the main branch and the final commit of your feature branch.
Think of it like carefully weaving a side plot back into the main storyline of a novel. You don't erase the side story; instead, you explicitly mark the point where it rejoined the main narrative.
Here's why you might choose a standard merge:
- Full Traceability: It preserves the entire history of the feature branch, including every single commit. This gives you a complete, unedited record of the work, which is great for auditing how a feature came to be.
- Clear Context: The merge commit itself acts as a signpost, clearly showing where a feature branch was integrated. It makes it dead simple to see all the commits that were part of one pull request.
This approach is fantastic for teams that prize a detailed, warts-and-all historical record. The downside? It can create a complex, branching Git log that some developers find messy and hard to follow, especially on big projects with lots of contributors.
Squashing and Merging
The "squash and merge" option is all about tidiness. Instead of keeping every single "work-in-progress" commit from your feature branch, this strategy bundles them all into a single, polished commit on the main branch. The messy history of tweaks, fixes, and "oops" commits from your branch vanishes, replaced by one clean, comprehensive commit.
It’s like writing a rough draft with tons of notes and revisions scribbled in the margins. When you're finished, you don't hand in the messy draft—you submit the final, polished essay. That’s exactly what squashing does for your code.
A squash merge prioritizes a clean, readable history on the main branch. It turns a potentially chaotic series of development commits into a single, meaningful entry that represents the completion of one feature or task.
This strategy is perfect for teams who want their main branch history to read like a high-level changelog. Each commit lines up with a completed pull request, making it incredibly easy to see when features were added or bugs were fixed. The trade-off, of course, is that you lose the granular step-by-step story of how the feature was developed.
Rebasing and Merging
Rebasing is the most sophisticated of the three options, and its goal is to create the cleanest history imaginable. The "rebase and merge" strategy takes all the commits from your feature branch and essentially replays them, one by one, on top of the latest version of the main branch. This rewrites your branch's history to make it look as if you started your work from the most recent point in main.
The end result is a perfectly linear Git history. There are no branching shenanigans or extra merge commits. It looks like all the work was done in a neat, straight line, which is incredibly easy to follow.
This is the go-to method for many open-source projects and teams who demand a pristine, readable history. However, it comes with a warning: rebasing requires a solid understanding of Git. Rewriting history can be a bit dangerous if you don't know what you're doing, especially on branches that other people are using.
GitHub Merge Strategies Compared
Choosing between these options often comes down to balancing historical detail with readability. To make it clearer, here’s a quick comparison of how each strategy stacks up.
| Merge Strategy | Git History Impact | Best For |
|---|---|---|
| Merge Commit | Preserves all branch commits; creates a merge commit. History is detailed but non-linear. | Teams that need full traceability and want to see the explicit context of a feature branch. |
| Squash and Merge | Combines all branch commits into a single new commit on main. History is clean and linear. |
Teams that want a high-level, readable history where each commit represents a whole feature or fix. |
| Rebase and Merge | Replays branch commits on top of main. History is perfectly linear with no merge commits. |
Teams that prioritize a pristine, easy-to-follow history and are comfortable with rewriting branch history. |
Ultimately, the best strategy is the one that your team agrees on and understands. Consistency is key to maintaining a Git history that everyone can use effectively.
The total number of merged pull requests is also a vital metric for gauging your development pace and the health of your engineering workflows on GitHub. A steady or rising number of merged PRs often points to active feature development and efficient code review cycles. On the flip side, a decline could signal problems like overly large PRs that bog down reviewers, slow CI feedback loops, or even cultural issues that are hurting collaboration. You can learn more about how to measure PR velocity to get a better handle on your team's performance.
Using Analytics to Improve Your PR Process
Great development teams don't just follow a process; they constantly measure and refine it. Moving from gut feelings to data-backed decisions is what separates good teams from the truly elite. By tracking the right metrics, you can turn your pull request GitHub workflow from a reactive chore into a proactive engine for shipping better code, faster.
Think of your PR process like a factory assembly line. A single slow machine can create a bottleneck that ripples across the entire factory, grinding production to a halt. In the same way, hidden inefficiencies in your PR lifecycle can delay features, frustrate developers, and quietly drain your team's productivity. Analytics are your tools for spotting these slowdowns before they become major disasters.
Identifying Key Performance Indicators
To start measuring, you need to know what to look for. A few key performance indicators (KPIs) can give you a clear window into the health of your team's collaborative workflow. These aren't just numbers on a dashboard; they tell a story about how your team works together.
Here are some of the most impactful metrics you should be tracking:
- Time to Merge: This is the big one. It’s the total time from the moment a PR is opened until it’s finally merged into the main branch. It’s a master metric that reflects the efficiency of your entire review and approval cycle.
- Time to First Review: How long does a fresh pull request sit there, waiting for a teammate to leave the first comment? A long delay here can be a red flag that reviewers are overloaded or that your handoff process is broken.
- Review Cycles: How many back-and-forths does a typical PR go through? A high number of cycles might mean the initial submission wasn't ready for review, or that the feedback itself is unfocused and confusing.
- Pull Request Size: Usually measured in lines of code changed, this metric is almost always tied directly to review time. Smaller, more focused PRs are faster to review and much safer to merge.
The goal here isn't to micromanage developers or put a stopwatch on every keystroke. It’s about spotting systemic friction points in your workflow. Data empowers the team to have objective conversations about what’s working and what isn't, leading to collaborative, meaningful improvements.
For instance, a consistently long Time to Merge might not mean your reviewers are slow. It could be a symptom of something else entirely—like pull requests that are too large and complex to assess quickly. This insight lets you address the root cause by encouraging smaller, atomic changes, rather than just blaming people for delays. You can find more details on how to manage this in our GitHub pull request merge queue FAQ.
Transforming Data into Actionable Insights
Once you start gathering this data, you can diagnose problems with surprising precision. Let's say you notice a spike in review cycles that also corresponds with frequent CI/CD build failures. That's a strong signal that you need better local testing standards before a pull request on GitHub is ever opened. This insight allows you to implement pre-commit hooks or improve testing documentation, tackling the problem at its source.
Analyzing your workflow with metrics is crucial for uncovering these hidden bottlenecks. Tools like those available in the GitHub Marketplace can generate detailed reports on PR creation, review activity, and merge patterns. This gives teams a clear view of where delays happen and helps track whether the changes you're making are actually improving things.
By making data a central part of your process, you shift from guessing to knowing. This data-informed approach helps optimize your entire delivery pipeline, ensuring every pull request GitHub makes it from idea to production as smoothly and efficiently as possible.
Once you've gotten the hang of the manual pull request process, you'll probably start noticing all the little repetitive tasks that eat up your day. Let's be honest, developers create the most value when they're tackling tough problems, not babysitting PRs or nudging colleagues for reviews.
This is exactly where an automation tool like Mergify comes into play. Think of it as a tireless assistant for your repository, handling all the predictable, rule-based jobs that slow your team down. It tackles the manual grind that can bring your entire development cycle to a crawl.
Putting Pull Requests on Autopilot
Just think about all the time your team sinks into routine PR management. Chasing down reviewers, applying labels, constantly checking CI status, and finally clicking the merge button on an approved branch—these tasks are essential, but they don't exactly require deep, creative thinking. Automation simply takes this work off your plate, letting your team stay locked in on what they do best: coding.
With a simple configuration file right in your repository, you can lay out a set of rules that Mergify will follow to the letter. This isn't just about saving a few clicks; it's about embedding your team's best practices directly into your workflow.
The real magic of automation is that it codifies your team's standards. It ensures every single pull request is held to the same quality bar, without anyone having to rely on memory or manual checklists.
For example, you could easily set up rules to:
- Automatically merge a pull request as soon as it gets two approvals and all CI checks pass.
- Assign specific reviewers based on the files changed, making sure the right experts always see the code that matters to them.
- Add labels like
needs-revieworwork-in-progressdepending on the PR's real-time status. - Revert changes automatically if a merged PR is later discovered to be causing problems in production.
Driving Efficiency with Data and Automation
This level of automation does more than just cut down on human error—it also gives you a treasure trove of data about how your team actually works. The modern pull request GitHub process is becoming more and more data-driven. GitHub pull requests are now a core part of software development, and specialized tools track tons of developer and repository metrics tied to them.
This data-driven insight helps you zero in on bottlenecks, whether they're caused by slow reviews, complex test suites, or subpar code quality. You can learn more about how to get PR statistics from GitHub to really understand these trends.
Ultimately, by automating your PR management with a tool like Mergify, you enforce consistency and seriously boost your development velocity. Teams can ship features faster, merge with more confidence, and reclaim precious engineering hours for the work that truly drives the business forward.
Common Questions About Pull Requests
Even after you get the hang of the workflow, a few specific scenarios around the pull request GitHub process can trip people up. Let's tackle these common questions head-on to clear up any confusion and help you manage your code contributions with confidence.
Think of these as the quick-fire answers to reinforce what you've just learned. The most common point of confusion? It's almost always the relationship between the pull request itself and the final act of merging.
What Is the Difference Between a Pull Request and a Merge?
This one is simple. A pull request is the entire conversation, the whole shebang. It's the formal proposal where your team gets to discuss, review, and collaboratively hammer out your code changes until they're just right. The pull request is the forum for debate and quality control.
A merge, on the other hand, is the final, decisive action. It only happens after the pull request has been approved by everyone who needs to see it. Merging is the technical step of taking the approved code from your feature branch and officially integrating it into the main branch. It's the moment your changes become a real part of the project.
A pull request is the proposal and the collaborative review; the merge is the final act of acceptance that incorporates the work.
How Do You Handle Merge Conflicts in a Pull Request?
Merge conflicts happen. They’re a completely normal part of working on a team where multiple people are pushing changes. A conflict pops up when the changes in your branch clash with recent updates made to the target branch (like main). When this happens, GitHub will stop you from merging until the conflict is fixed.
The responsibility for sorting this out falls squarely on the PR author. You’ll need to pull the latest changes from the target branch into your feature branch. Git will then flag the conflicting files, and you'll have to manually edit them to decide what the final code should look like. Once you’ve resolved everything, you just commit the fixes and push them up, which automatically updates the pull request.
To make this less of a headache, it pays to explore ways to improve your pull request management and stop these issues before they start.
Can You Cancel or Close a Pull Request?
Absolutely. A pull request isn't a binding contract. You can close it at any time without merging a single line of code. This is super common in a few situations: maybe the proposed change is no longer needed, a better solution came up, or the feature just got deprioritized.
On the pull request page, either the author or a repository maintainer can simply click the "Close pull request" button. It's always good practice to leave a quick comment explaining why it's being closed. And don't worry—closing the PR doesn't delete your branch. You can clean that up separately.
At Mergify, we build tools to automate these tedious parts of your workflow. Our platform handles everything from merging approved PRs to batching CI runs, letting your developers focus on building great software, not managing it. Find out how to supercharge your team at Mergify.