How to Push to GitHub: A Short Guide

GitHub has done quite a lot for the developer community over the years, facilitating the kind of collaboration on code that modern dev projects simply could not survive without. GitHub ships tens of thousands of improvements per year to help keep dev teams all over the world from waking up to segmentation faults and vanishing codebases. Yet, none of GitHub’s (or Git’s) procedural optimizations work without a merge, a pull, and a push or two.
Pushing to GitHub is an essential part of publishing code for public perusal and eventual merging with a remote codebase. When you push code, it travels from your local development environment (your computer) to the remote server where the rest of your project’s code is stored. You’ll need to know how to push changes to GitHub from your machine to keep your remotely hosted codebase in sync with the work you complete.
How to push to GitHub 🤔
To learn how to push files to GitHub, you’ll first need to get Git set up and running on your machine. Once that has been done, you can instruct Git to recognize your remote repository (referred to as a “remote” in Git) and tell it to update it as needed. Understanding everything there is to know about how to commit and push changes to GitHub isn’t necessary for you to use it correctly—but having a working understanding of the process as well as knowing how a push is supposed to work can help you deal with any of the possible complications that may arise later on. With that in mind, let’s go through the basic steps.
1. Set up Git ✅
Setting up Git is the absolute first step you will need to take to use the git push command. Git commands are generally run from within a command prompt or terminal window. Of course, the process will depend largely on the type of operating system you’re using, but the following platform-specific instructions should be enough to get your installation up and running quickly.
Tips for setting up Git on Windows 🪟
First, you’ll need to visit the official Git website to download an appropriate installation package. Open the file and launch the installer, then follow the steps given. Default installation settings should be fine, so there’s no need to fiddle with them. Git will ask you to choose a default code editor (and many other optional features), then you’ll be able to run Git Bash (and Git GUI) from the start menu.
Tips for setting up Git on Mac 🍎
You can quickly and easily install Git on Mac by installing the Xcode Command Line Tools. This can be done succinctly on Mavericks (10.9) or above by attempting to run Git from your system’s terminal window (try git –version to see what version you may have installed already or trigger the Command Line Tools installation).
Tips for setting up Git on Linux 🐧
Different Linux distros will require that you use their built-in package managers to install Git. For instance, Ubuntu and Debian use apt while Fedora uses either dnf or yum. These can be accessed from a terminal window to handle the entire installation process (try sudo apt-get install git or sudo dnf install git to get started). Once done, you can move on to starting and configuring your Git installation.
2. Start Git and configure a remote branch ⚙️
You’ll need to navigate within your shell/terminal session to the directory you want your push operation to originate from to get started. Once there, you can run git init to create the necessary subdirectory Git will use to handle this and other operations. You can now add in commits as needed with git commit.

Once you’re ready to push your updates to a remote branch, you’ll need to add that branch to your local Git environment. This is done with git remote add followed by a nickname of your choice for your project, then your project’s remote URL.
3. Push your commit to GitHub 🎉
You can now move your local commits to the remote branch you already added in the previous step. All you need to do is run git push <REMOTENAME> <BRANCHNAME> where the remote name is the nickname you’ve given your remote repository, and the branch name is your local machine’s branch name (normally master or main). If you are presented with errors of some kind, it may be necessary to:
- Ensure you’re working on the correct branch. Use “git status” to check which branch you are on.
- Checkout to a new branch if your work was not yet on any branch by using
git checkout -b <BRANCHNAME>, then push this branch withgit push -u origin <BRANCHNAME>.
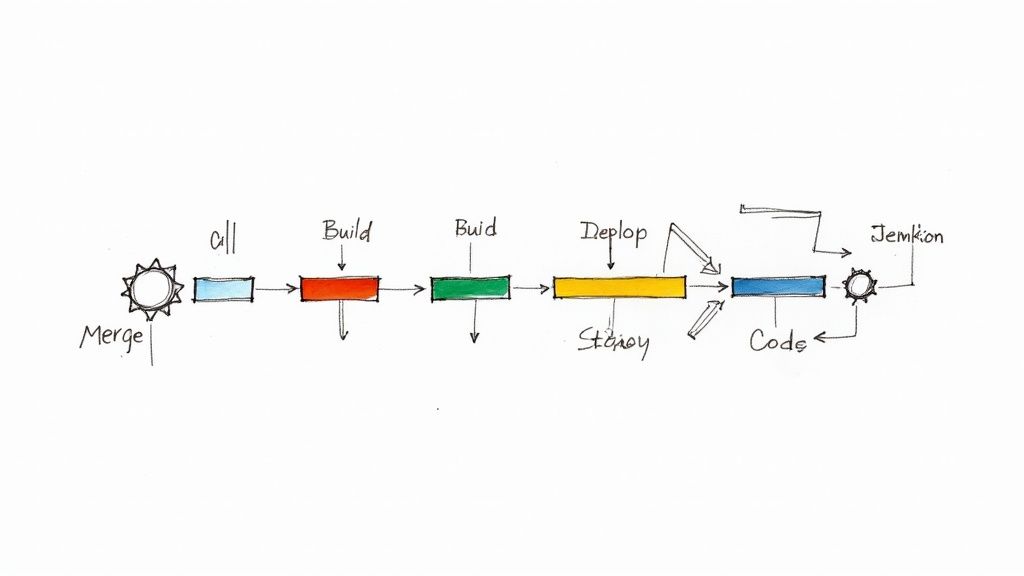
Let Mergify manage the rest 🥰
Pushing is just one part of the process when it comes to managing a GitHub repository with loads of files, hundreds of commits, and endless push/pull requests. Mergify simplifies the tedious details inherent to handling an active repo by automating your merges, rebases, comments, labels, and more. To learn how Mergify can help your team tackle its GitHub challenges, schedule a demo today.