Handling Emergency Pull Requests Using Merge Queues
In this tutorial, we will explore how to manage emergency pull requests by creating multiple merge queues based on priority! 🔼

In this tutorial, we will explore how to manage emergency pull requests by creating multiple merge queues based on priority! 🔼
Introduction
Handling emergency pull requests has been a topic of debate in the developer community since the advent of Agile and DevOps practices.
In such scenarios, we need a system that can prioritize these 'urgent' requests over regular PRs and allows us to postpone some CI checks if necessary.
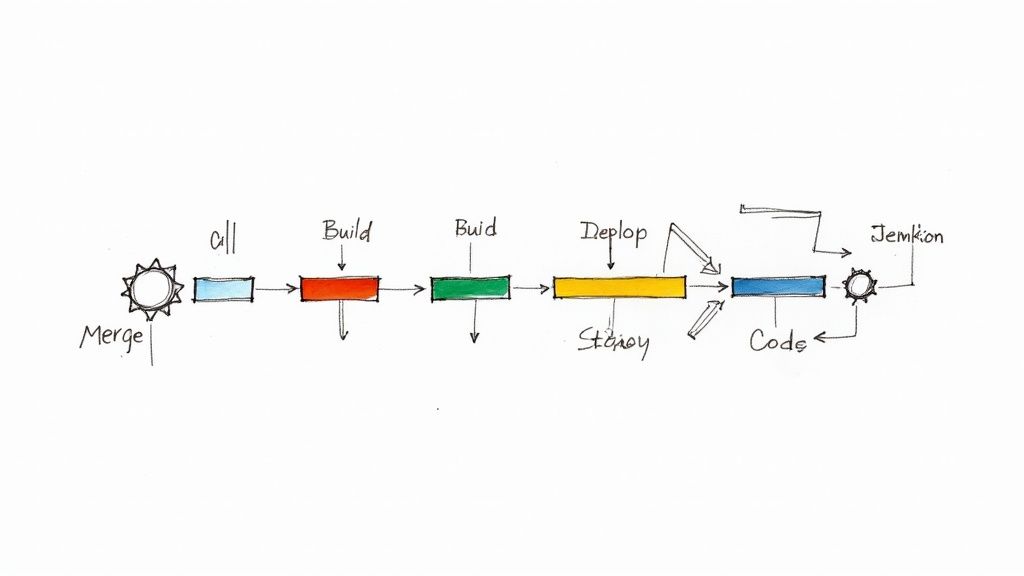
One good strategy can be to implement a separate merge queue altogether, which allows us to get ahead of the default queue even before the CI tests have passed and expedite our urgent fixes to production.
In this article, we will create two merge queues with Mergify triggered by PR labels. We will configure one for regular PRs and the other to handle emergency PRs.
So, let's roll up our sleeves and start! 🧑💻
For this demo, we are going to initial a simple React application. And for CI we will be using CircleCI.
We will create two merge queues:
default- All the PRs will go through it regularly. It requiresCircleCIchecks before processing.urgent: This queue is only for the PRs that have theurgent labelin the PR. This allows the PRs to jump to the front of PRs in thedefault queuewithout running CircleCI checks.
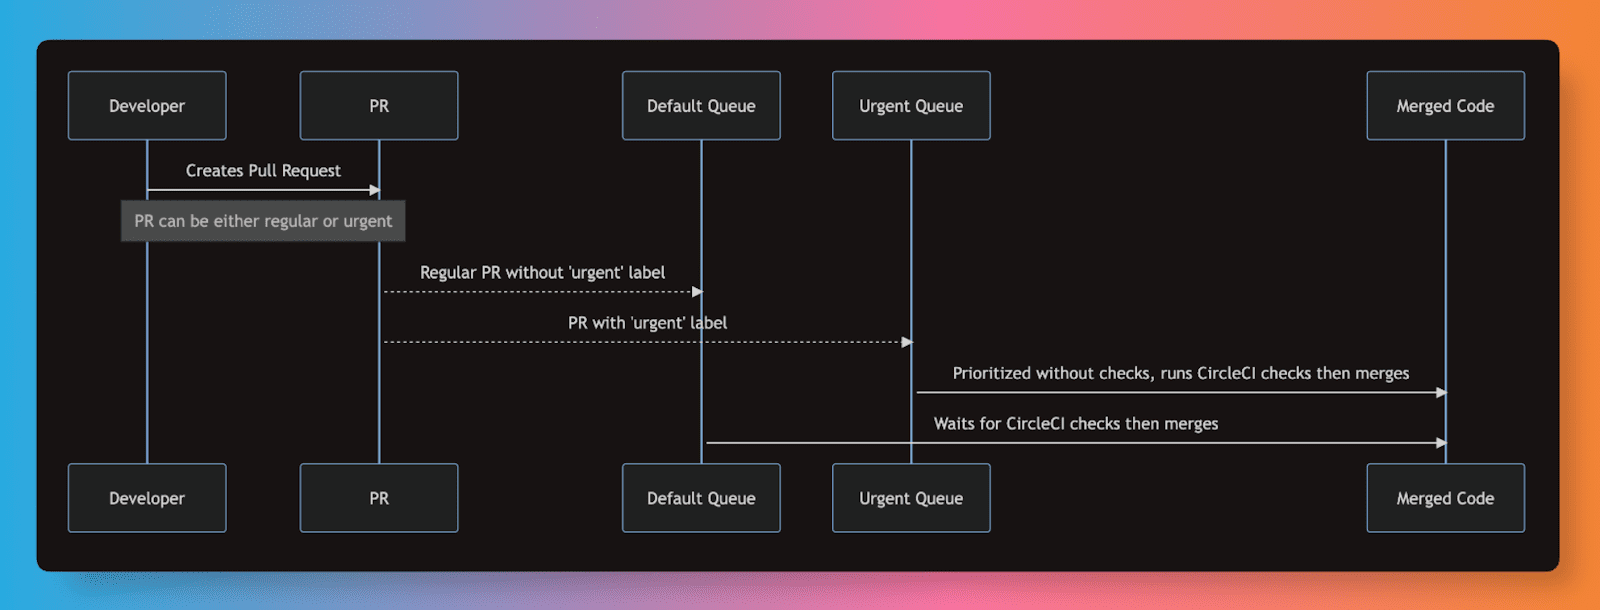
With such a configuration, a pull request with the label urgent will get into the queue before the CI has even run on it.
It will be in front of the default queue. Mergify will update the pull request with its base branch if necessary, wait for the CI to pass, and then merge the pull request.
From the development team's perspective too, this is a rather simple process. The developer just needs to add an urgent label while creating the PR to speed up the process.
Step 0: Setting up our project
Let's get started with setting up our project. We would create a new react application using create-react-app.
mkdir emergency-pr-demo
cd emergency-pr-demo
git init
npx create-react-app .
For reference, this will be our final project structure after we add our CI and Mergify config. ⬇️
emergency-pr-demo/
├── .circleci
│   └── config.yml
├── README.md
├── package-lock.json
├── package.json
├── .gitignore
├── .mergify.yml
├── .vscode
├── public
│   ├── favicon.ico
│   ├── index.html
│   ├── logo192.png
│   ├── logo512.png
│   ├── manifest.json
│   └── robots.txt
└── src
    ├── App.css
    ├── App.js
    ├── App.test.js
    ├── index.css
    ├── index.js
    ├── logo.svg
    ├── reportWebVitals.js
    └── setupTests.js
Step 1: Creating CI Config
For running our tests, we will use CircleCI. It's easy to set up and get started with. ✨
Here, we will create a config.yml file in a new .circleci directory at the root of our project.
We will create a simple job build_and_test that will first help us in checking whether our project is getting built as expected and then run the unit tests with npm run test command. 🧪
version: 2.1
orbs:
  node: circleci/node@5.0.2

jobs:
  build_and_test:
    executor: node/default
    steps:
      - checkout
      - node/install-packages:
          pkg-manager: npm
      - run:
          command: npm run test
          name: Run tests
      - run:
          command: npm run build
          name: Build app
      - persist_to_workspace:
          root: ~/project
          paths:
            - .

workflows:
  test_my_app:
    jobs:
      - build_and_test
.circleci/config.ymlStep 2: Creating Mergify Config
Now it's time to create our Mergify configuration file. 📑
Mergify is a tool that automates the process of merging pull requests in code repositories, based on predefined rules and conditions. 🤖
We need to define two queues in our config file as planned: urgent and default.
Both have the same merge_conditions, check-success=ci/circleci: build_and_test, which means that the code must successfully pass the build_and_test check in CircleCI before it can be merged.
The pull_request_rules section outlines how pull requests should be handled. We will place our PR in urgent queue if it has the label urgent. Otherwise, it will get into the default queue.
.mergify.yml
queue_rules:
  - name: urgent
    merge_conditions:
      - "check-success=ci/circleci: build_and_test"

  - name: default
    merge_conditions:
      - "check-success=ci/circleci: build_and_test"

pull_request_rules:
  - name: move to urgent queue when label urgent
    conditions:
      - base=main
      - label=urgent
    actions:
      queue:
        name: urgent

  - name: merge using the default queue after running the CI checks
    conditions:
      - base=main
      - "check-success=ci/circleci: build_and_test"
      - label!=urgent
    actions:
      queue:
        name: default
Step 3: Setting up the repository
No we would go ahead and create a new repository on GitHub. 🐈⬛
After this we would need to make an initial commit and push our code using the following commands:
git add .
git commit -m "Initial commit"
git remote add origin <REPO_URL>
git push -u origin master
Next, we would need to set up CircleCI. For this, we will visit the CircleCI Dashboard, then go to the projects section and set up our project.
We would also need to specify our main branch. CircleCI will automatically detect our config file in this case.
We can install Mergify in our GitHub account by visiting dashboard.mergify.com or github.com/apps/mergify/installations/new and logging in with our GitHub account.
Then we could select the repositories to which we want to give access to Mergify.
Once set up, we would be able to see both of our queues in the Mergify Dashboard. 🖥️
Step 4: Raising the first PR (Regular PR)
Now let's get started with creating our first PR. We would first create a new branch regular-pr
git checkout -b regular-pr
git add .
Just for demo purposes, we will now add a class in App.css file.
.Regular-change-class {
	background-color: white;
}
After this, we would make a commit and push our changes to GitHub. 🔼
git commit -m 'regular CSS change'
git push --set-upstream origin regular-pr
Next, we will raise a Pull Request without any tags.
Step 5: Raising the second PR (Urgent PR)
Now we would create a new branch urgent-pr, for our changes.
git checkout main
git branch -b urgent-pr
First, we will make a commit, where we will create a new component Urgent.js.
import React from "react";

export default function Urgent() {
  return <div>This is an Urgent Change</div>;
}
Now we will push this (urgent-pr) branch to our GitHub repo.
git add .
git commit -m 'Create a component for Urgent change'
git push --set-upstream origin urgent-pr
Then we will go to our repo and raise a new PR from urgent-pr branch to main branch and add a new label urgent.

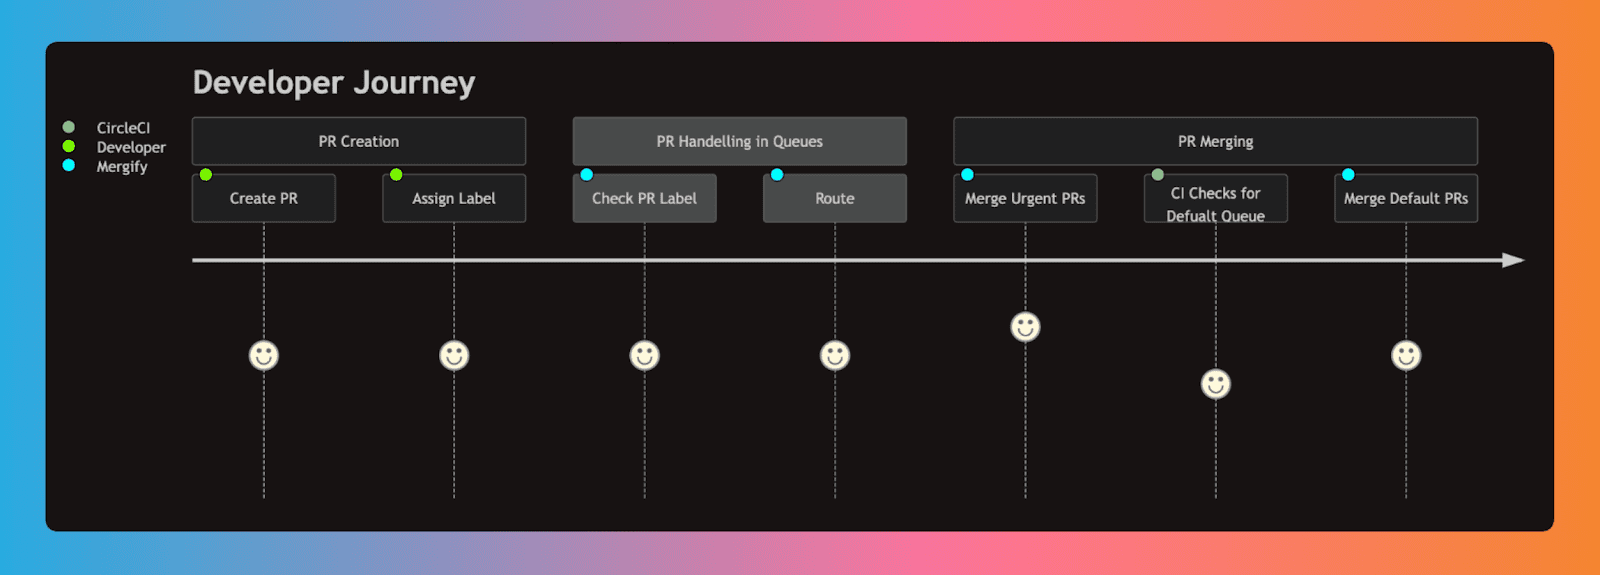
🪄 Mergify automatically puts the second pr in the urgent queue, then runs the CI checks and merges it with the mainbranch.
Then merges the first PR automatically.
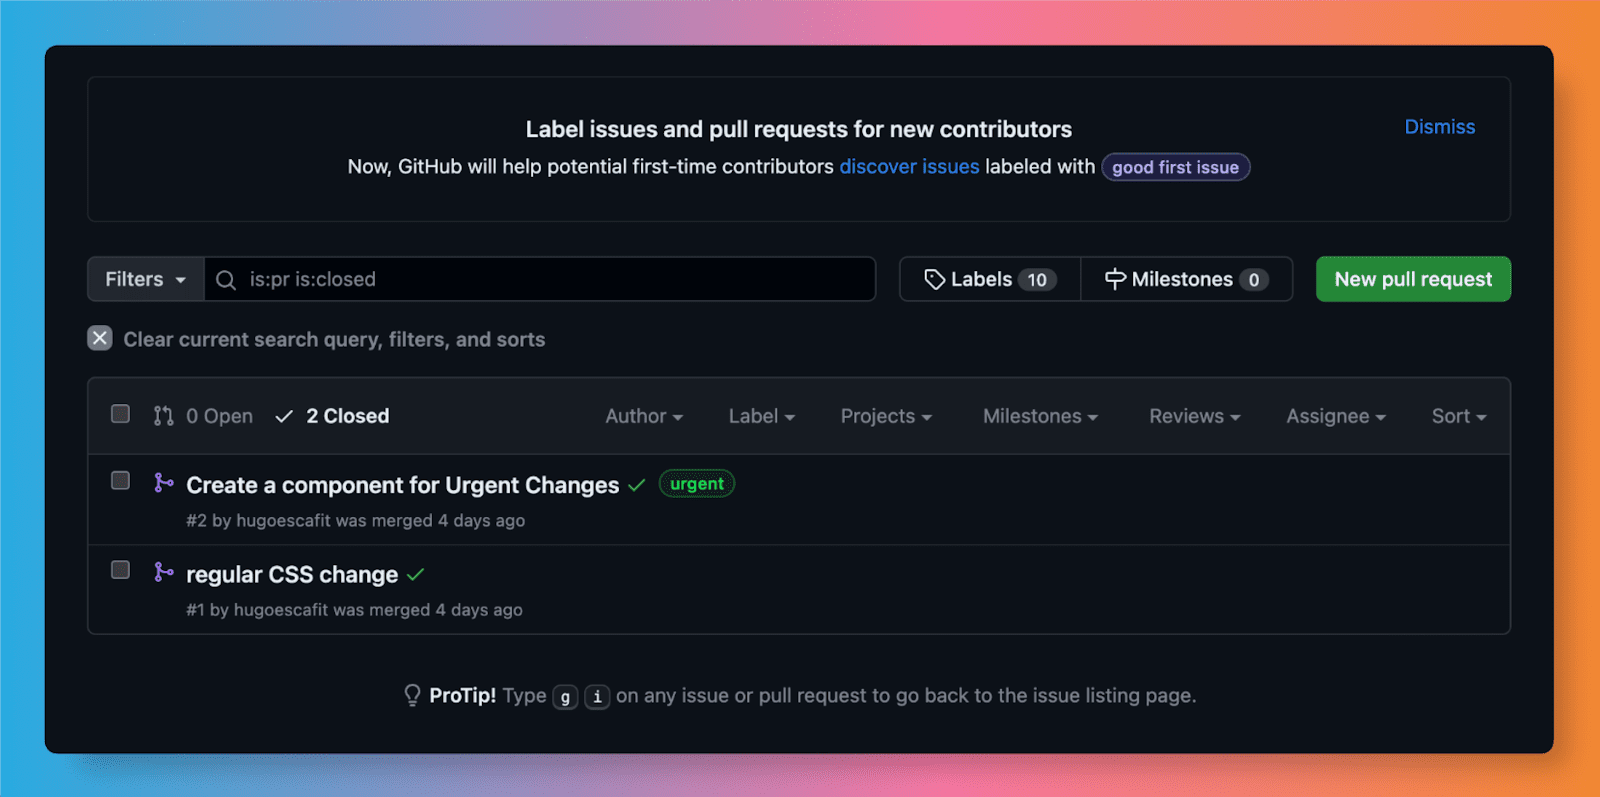
You can check out the GitHub repository here for reference: github.com/hugoescafit/emergency-pr-demo
Conclusion
That's it for this time! 🙌
In this tutorial, we've explored the process of setting up two distinct merge queues, default and urgent, with the help of Mergify and setting up CI checks with the help of CircleCI. We've also seen how to prioritize emergency PRs over regular ones.
There are various other solutions for emergency pull request management, such as creating a special hotfix branch for it, having dedicated reviewers, and even manually overriding checks. But merge queues are one of the best and easy-to-implement strategies to handle this issue.
Visit Mergify to start adding merge queues to your application! 🧑💻