Git Revert Commit After Push A Developer's Guide

It’s a moment every developer knows all too well: the sinking feeling when you realize a buggy commit just went live on a shared branch. We've all been there. The immediate, safe, and professional way to handle this is with git revert. This command is your best friend in this scenario, creating a new commit that cleanly undoes the changes from a previous one while keeping the project's history intact.
Why Git Revert Is Your Safest Bet for Pushed Commits
When you need to undo a commit that’s already been pushed to a remote like GitHub, you really have two main tools at your disposal: git revert and git reset. While they might sound similar, their approaches and consequences are worlds apart, especially when you're working with a team. Getting this choice right is critical for team harmony and the health of your repository.
The fundamental difference comes down to how they treat your Git history. Think of your project’s commit log as an immutable ledger. git reset is like tearing a page out of that ledger. This is what we call rewriting history.
The Danger of Rewriting Public History
Using git reset --hard on a shared branch and then force-pushing is a recipe for disaster. When you git push --force, you're essentially telling the remote server, "Forget the history you have; mine is the only correct one now." This is an incredibly disruptive action in a collaborative setting.
Any teammate who has already pulled the original history now has a local version of the branch that directly conflicts with the new, rewritten one you just forced.
This immediately kicks off a cascade of problems:
- Synchronization Nightmares: Your teammates' local repositories are now out of sync. This leads to confusing, hard-to-resolve merge conflicts that waste everyone's time.
- Lost Work: Force pushing can easily overwrite commits that others have pushed in the meantime, silently wiping out their work without a trace.
- Broken Trust: This kind of move undermines the shared understanding of the project's history, which is the very foundation of collaborative development.
The Safety of Preserving History
This is exactly where using git revert shines. Instead of trying to erase history, git revert adds to it. It creates a brand new commit that contains the inverse of the changes from the specific commit you need to undo.
Key Takeaway: git revert doesn't delete a thing. It creates a new, transparent "undo" commit. This preserves the project’s history, prevents synchronization issues, and maintains stability for the entire team.To give you a clearer picture, here’s a quick comparison of why git revert is the superior choice for commits that have already been pushed to a shared branch.
Git Revert vs Git Reset for Pushed Commits
| Attribute | Git Revert | Git Reset (Hard) |
|---|---|---|
| History | Preserves history by adding a new commit. | Rewrites history, deleting commits. |
| Safety | Safe for shared branches. | Dangerous for shared branches. |
| Collaboration | No disruption to other developers' work. | Causes major sync issues and merge conflicts. |
| Use Case | Undoing public/pushed commits. | Undoing local, unpushed commits. |
This additive approach is the industry standard for correcting mistakes on shared branches. Millions of open-source projects rely on git revert for a reason—it ensures the commit timeline remains intact and auditable. You can find more practical insights on why this is a safe version control practice on GeeksforGeeks. It's a fundamental command that maintains the integrity of a shared history.
Ultimately, by creating a forward-moving change, git revert works seamlessly with your team's workflow and any CI/CD pipelines you have in place. It's the professional, collaborative way to fix mistakes without creating chaos.
Alright, let's get into the nitty-gritty of actually reverting a commit. Theory is one thing, but knowing the exact steps when you're staring at a broken main branch is what really matters. The process itself is pretty straightforward, but you need to be precise. It all starts with pinpointing the exact mistake you need to undo.
First things first, you need the unique ID of the commit that's causing all the trouble. We call this its hash. The easiest way to find it is with git log. Just pop open your terminal and run that command. You’ll see a list of recent commits, showing who did what and when.
Skim through the log until you spot the problematic one. Once you’ve found it, copy its long alphanumeric hash (something like f28d90c12e8e73e61a2b3c4d5e6f7a8b9c0d1e2f). Pro tip: you usually only need the first 7 to 10 characters to uniquely identify it.
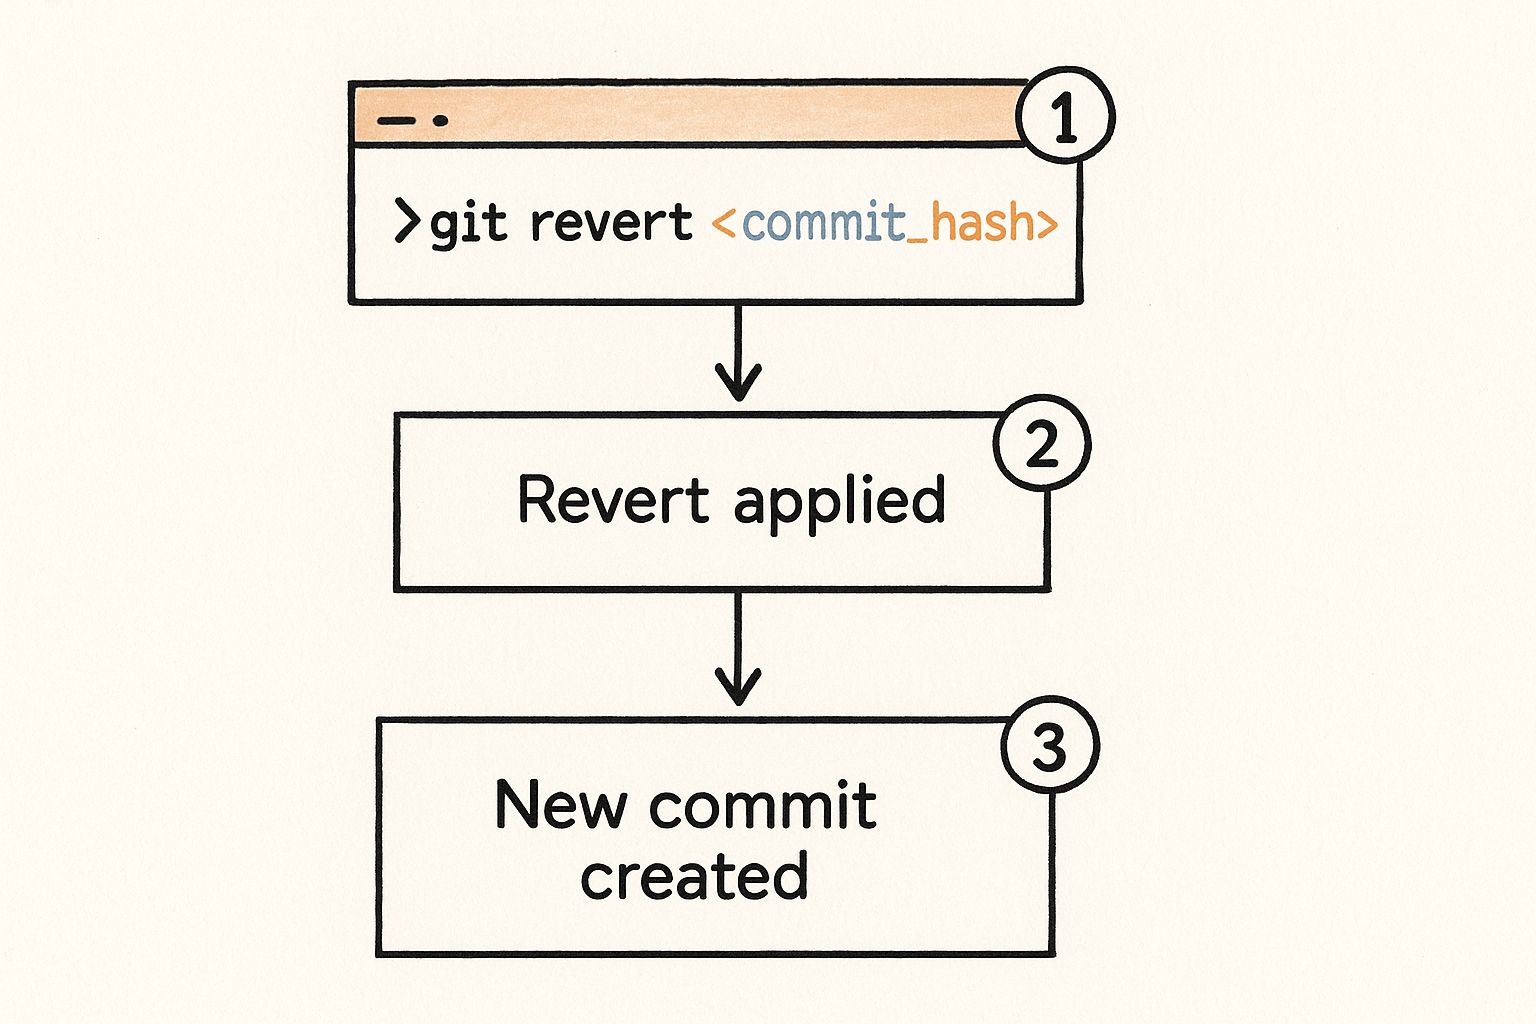
Executing the Revert
Got the hash? Great. Now for the main event. In your terminal, still in your project directory, type this out:
git revert f28d90c
Of course, you'll swap f28d90c with the actual hash you just copied. The moment you hit enter, Git gets to work. It figures out the exact opposite changes required to nullify that commit and applies them to your local files. It’s like creating a perfect antidote to the bad code.
This is the beauty of git revert—it preserves the project's history. It doesn't erase the mistake; it adds a new commit that fixes it. That’s why it’s so safe for shared branches where rewriting history would cause chaos.
Nailing the Revert Commit Message
After running the command, Git will pop open your default text editor (like Vim or Nano) with a pre-filled commit message. It’ll probably look like this:
Revert "Original commit message"
While that works, don't just accept the default. You should always improve it. A solid revert message explains why the original commit had to be undone. This context is gold for your teammates and your future self.
A great revert message is a form of documentation. It should briefly state the problem the original commit caused (e.g., "broke the user authentication flow") and why reverting was the chosen solution.
For instance, a much more helpful message would be:
Revert "Add new user caching mechanism"
This reverts commit f28d90c1. The original change introduced a race condition that caused intermittent login failures under heavy load. Reverting to stabilize the main branch while a proper fix is developed.
See the difference? Now anyone looking at the history knows exactly what happened and why.
Pushing the Fix to Remote
Once you save and close the editor, Git creates the new revert commit on your local branch. All that's left is to share your fix with the rest of the team by pushing it to the remote repository.
git push origin main
Just be sure to replace main with whatever your branch is named. This push is completely safe and follows standard procedure because you've simply added a new commit, not rewritten history. Consistently following these steps is one of the key Git workflow best practices that keeps a project clean and collaborative.
Now your team can pull the latest changes, and just like that, the problematic code is gone from the live branch. Problem solved.
Reverting Multiple Commits Without the Mess
Sometimes a single bad commit isn’t the problem. The real headaches begin when you realize a nasty bug was introduced bit by bit over several commits. Reverting them one by one is an option, sure, but it will absolutely litter your project history with a confusing trail of "Revert..." messages. It makes the log painful to read and even harder to understand later on.
Thankfully, Git gives us a much cleaner way to handle this. You can target a whole range of commits and roll them all back in a single, atomic action. This is how you git revert commit after push for multiple changes without making a complete mess of your history.
Identifying the Commit Range
First things first, you need to tell Git which block of commits you want to undo. Git has a handy range syntax that makes this pretty straightforward. You can specify a range using commit hashes or even relative references like HEAD.
For example, if the last three commits are the culprits, you can target them like this:
HEAD~3..HEAD
This tells Git to grab everything from the third-to-last commit right up to the current one. If the bad commits aren't all in a row, you can always run git log to find their specific hashes and just list them out.
The Power of the --no-commit Flag
Here’s the real secret to keeping your history clean: the --no-commit flag. When you use this with git revert, Git will reverse all the changes from the commits you specified and stage them, but it won't automatically create a new commit. This is huge because it puts you in complete control.
By using --no-commit, you get to bundle all the individual reversals into one logical group. This lets you write a single, clear commit that explains the entire rollback, rather than cluttering your history with a bunch of repetitive, low-context revert commits.This approach is incredibly valuable for maintaining a readable and meaningful commit history—a practice that pays dividends in team collaboration. In fact, developer reports show that around 65% of developers find themselves needing to revert pushed commits every month. For these common situations, being able to revert multiple changes at once is a major time-saver. You can dig deeper into these practices in this guide to reverting pushed commits.
Let’s walk through what this looks like in practice. Imagine you need to undo the last three commits pushed to your main branch.
- Execute the Revert, but Hold the Commit Run the revert command with your range and the magic flag.git revert --no-commit HEAD~3..HEAD This command applies the inverse of all three commits to your working directory and adds them to the staging area.
- Double-Check the Staged Changes Before you finalize anything, it's always a good idea to check what you’re about to commit.git status You should see a list of all the files that have been modified and are staged. This is your chance to make sure everything looks right. No surprises.
- Create Your Single, Clean Commit Now, you can wrap all those staged changes into one clear, descriptive commit.git commit -m "Revert: Remove faulty payment feature from commits X to Y" Always write a good message explaining why you're reverting this block of work. It provides crucial context for anyone (including your future self) looking at the history.
Finally, just push this single, clean revert commit to the remote repository. Your project history stays clean, the bugs are gone, and your team can easily understand exactly what happened and why.
The Hidden Dangers of Force Pushing
We've been talking about git revert as the professional, safe way to undo changes after a push. But it's just as important to understand its chaotic sibling: git push --force. This command is a seriously powerful tool, but using it on a shared branch is like taking a sledgehammer to a delicate watch. It doesn't just fix things; it breaks them in new and excitingly stressful ways.
The real danger is right in its job description: rewriting history. A force push effectively tells the remote server, "Forget everything you know. My local version of this branch is the one and only truth now." In a team environment where multiple developers depend on a consistent, shared history, this is incredibly disruptive.
The Chaos of a Force Push Scenario
Let's paint a picture. A developer, Alex, finds a bug he just introduced. To "clean it up," he uses git reset on his local machine and then force-pushes his "fixed" branch to main. Simple, right?
Not so fast. While Alex was doing his local cleanup, his teammate, Maria, pulled the original main branch and started building her new feature on top of it.
When Alex force-pushes, he obliterates the commit Maria based her work on. The remote main branch now has a completely different history. When Maria tries to push her finished feature, Git throws a fit. Her local branch has diverged so wildly from the rewritten remote history that she's now facing a storm of confusing, hard-to-fix merge conflicts. Best case, it's hours of work to untangle. Worst case, Maria's work is just gone.
This destructive potential is exactly why most teams ban force-pushing to protected branches like main or develop. It silently erases work and creates what we call divergent histories, making it a nightmare to figure out what actually happened. Understanding why preserving history matters is fundamental. If you want to dig deeper, the classic debate of git merge vs rebase offers a great look into why rewriting history can be so problematic.
A force push is like telling your team, "My version of reality is the only one that matters. Any work you did based on the old one is now your problem to fix."
When Is It (Maybe) Okay to Force Push?
So, is it always a bad idea? Not always. There are a few very specific, tightly controlled situations where a force push is acceptable. The critical difference comes down to whether the branch is shared or private.
Force-pushing is generally considered safe only if:
- You are the only person working on that specific feature branch.
- The branch has not been merged into a shared branch like
mainordevelop. - You've checked with your team and are 100% certain no one else has pulled your branch or based any work on it.
Even in these isolated cases, there's a safer way. Use git push --force-with-lease instead. Think of it as a force push with a built-in safety check. It verifies that the remote branch hasn't been updated by someone else since you last pulled. If it has, the push will fail, stopping you from accidentally overwriting a colleague's contributions.
When you git revert a commit after pushing it, you're not just undoing code. You're setting off a chain reaction that should echo across your entire development ecosystem. A revert isn't a sign of failure; it’s a mature way to keep the codebase stable. In any modern workflow, this action needs to plug seamlessly into both your automated pipelines and your team's communication channels.
The first, and most critical, piece of the puzzle is how a revert interacts with your CI/CD systems. When you push a revert commit, it absolutely must trigger your pipeline just like any other change. This ensures the newly "undone" state of your code is fully tested and validated before it ever sees the light of day.
Think about it: you revert a commit because it broke the build. Your CI pipeline kicks off on that revert commit, and all the tests should now pass, confirming the fix. This automated validation loop is what gives you confidence and keeps things moving fast. You can dive deeper into this in our complete guide to what is a CI/CD pipeline.
Keeping the Team in Sync
Beyond the nuts and bolts of automation, the human element is just as important. A silent revert is a recipe for chaos. Why did that feature suddenly vanish? Did someone’s hard work just get wiped out? To head this off, transparent communication isn't just nice to have—it's non-negotiable.
As soon as you perform a revert, you have to tell your team. This creates a shared understanding and stops other developers from unknowingly building on top of code that's about to disappear.
Pro Tip: Set up a clear, simple team policy for reverts. For instance, after pushing a revert, immediately post a message in a designated Slack channel. Your message should include the reverted commit hash, a link to the revert commit itself, and a short, clear reason for what happened.
This simple step transforms a potentially confusing event into a controlled, professional process. Integrating with your project management tools is another great habit. For example, you could link the revert commit back to the original Jira ticket for the faulty code. This gives you a complete audit trail of the feature's entire lifecycle—from creation to removal and, eventually, to its proper fix.
Reverts as a Standard Operational Procedure
If you look at how Git workflows have evolved, there's a clear trend toward making post-push operations safer. In places where teams deploy changes dozens of times a day, being able to roll back a problematic commit quickly and safely is essential. The git revert command lets you do this without rewriting history, which means you avoid downtime and preserve the audit trails needed for compliance. It's no surprise that educational content on safe rollback methods has exploded in popularity, as you can see in discussions on platforms like YouTube.
By treating a git revert as a standard operational event—with its own defined technical and communication rules—you turn it from a simple command into a cornerstone of a healthy, transparent, and efficient development culture.
Common Questions About Reverting Pushed Commits
Even once you get the hang of git revert commit after push, certain situations can still throw you for a loop. Let's walk through some of the tricky questions that pop up all the time when you need to undo changes in a shared repository. Think of this as the field guide for handling those edge cases with confidence.
What Happens If I Try to Revert a Merge Commit?
Reverting a regular, single-parent commit is a walk in the park. Reverting a merge commit, however, is a different beast entirely.
If you just run a standard git revert <merge-commit-hash>, Git will immediately halt and throw an error. Why? Because a merge commit has two parents, and Git has no idea which branch’s history you want to preserve. It’s asking, "Which side of this merge is the 'correct' one?"
To get past this, you have to explicitly tell Git which "mainline" to keep by using the -m flag. The command looks like this:
git revert -m 1 <merge-commit-hash>
That number 1 tells Git to keep the history of the first parent, which is almost always the branch you merged into (like main or develop). Before you run this, it's always a good idea to run git log on the merge commit to double-check the parents and make sure you're picking the right one.
Can I Revert a Revert Commit?
Yes, you absolutely can. It sounds a bit like a paradox, but it's a perfectly normal—and surprisingly useful—operation.
At its core, a revert commit is just another commit in your project’s history. It has its own unique hash and introduces a set of changes. The only thing special about it is that its changes happen to be the inverse of a previous commit.
So, what if you revert something and then realize, "Oops, that original code was right all along"? You just revert the revert.
Key Takeaway: To undo a revert, you treat the revert commit like any other. Find its hash, run git revert on it, and you're done. This creates a new commit that re-applies the original changes, leaving a clear, auditable trail of the entire back-and-forth.Is It Better to Revert or Push a New Fix?
This is the classic "it depends" scenario, and the right call really hinges on the severity and context of the problem. Your decision here affects not just the stability of your codebase but also the clarity of your Git history.
- Use
git revertfor emergencies. If a pushed commit breaks the build, crashes the app, or opens up a critical security hole, reverting is the fastest and safest way to get that bad code out of the branch. The absolute priority is restoring stability, and a revert does that instantly. - Push a new "fixup" commit for minor issues. Did you just push a feature and then spot a small typo, a minor UI alignment issue, or a non-critical logic error? For small things like this, creating a new commit with a fix is often much cleaner. This approach shows a natural, forward progression of work in the history rather than a reversal.
In short, think of it this way: revert for immediate removal of broken code and use fixup commits for incremental improvements. Using the right tool for the job keeps your repository stable and your commit log easy for everyone to follow.
Are your pull requests getting stuck in review cycles, or are CI costs spiraling out of control? Mergify's automation engine streamlines your entire code integration process. Use our Merge Queue to ensure your main branch is always stable, and leverage CI Insights to pinpoint and fix infrastructure bottlenecks before they slow your team down. See how you can save time and money at https://mergify.com.