Master E2E Testing with Playwright

Let's be honest: e2e testing with Playwright is quickly becoming the go-to standard for a reason. It's fast, dependable, and truly cross-browser. It’s a modern fix for the old headaches—like flaky tests and painful setups—that have frustrated development teams for years.
Why Modern Teams Choose Playwright for E2E Testing
For a long time, end-to-end testing frameworks felt like a necessary evil. The story was always the same: brittle tests that failed for no reason, slow run times that created bottlenecks in the CI pipeline, and a constant battle managing different browser drivers. This friction often meant nobody trusted the test suite, which defeats the whole point.
Then came Playwright, a Microsoft-backed tool built specifically to address these issues. It was designed from the ground up for a better developer experience and rock-solid reliability. Its architecture is fundamentally different. Instead of messing with external drivers like WebDriver, Playwright talks directly to browser engines, making interactions faster and more stable—much closer to how a real person uses a browser.
The Shift Away From Flaky Tests
One of the biggest wins with Playwright is its intelligent auto-waiting mechanism. Traditional frameworks often force you to sprinkle your code with explicit waits (sleep, waitForElement), which are a huge source of flakiness. Playwright, on the other hand, automatically waits for elements to be ready before it tries to click or type.
This built-in stability is a game-changer. It means developers spend less time chasing down random test failures and more time actually building features. You end up with a more efficient development cycle and a test suite the team can actually trust.
This focus on reliability is why it's growing so fast. Playwright has become the fastest-growing test automation tool in the world, leaving many established frameworks behind. On GitHub, it has over 74,000 stars—more than double what Selenium has—which speaks volumes about the community's trust and excitement.
A Vibrant and Growing Community
Playwright’s strength isn't just in the code; it's also in the active community behind it. This lively ecosystem means you get:
- Rapid Innovation: New features and fixes are released all the time, keeping the tool aligned with the latest web technologies.
- Excellent Documentation: The official docs are clear, thorough, and full of practical examples that actually work.
- Strong Support: With so many people using it, you can almost always find an answer to your problem on Stack Overflow or GitHub.
This mix of a powerful tool and a helpful community makes it much easier for teams to adopt robust e2e testing with Playwright. If you want to get into the nitty-gritty, you can explore our complete guide on Playwright E2E testing.
The chart below shows how a solid testing strategy, with E2E tests at the top, provides comprehensive coverage.
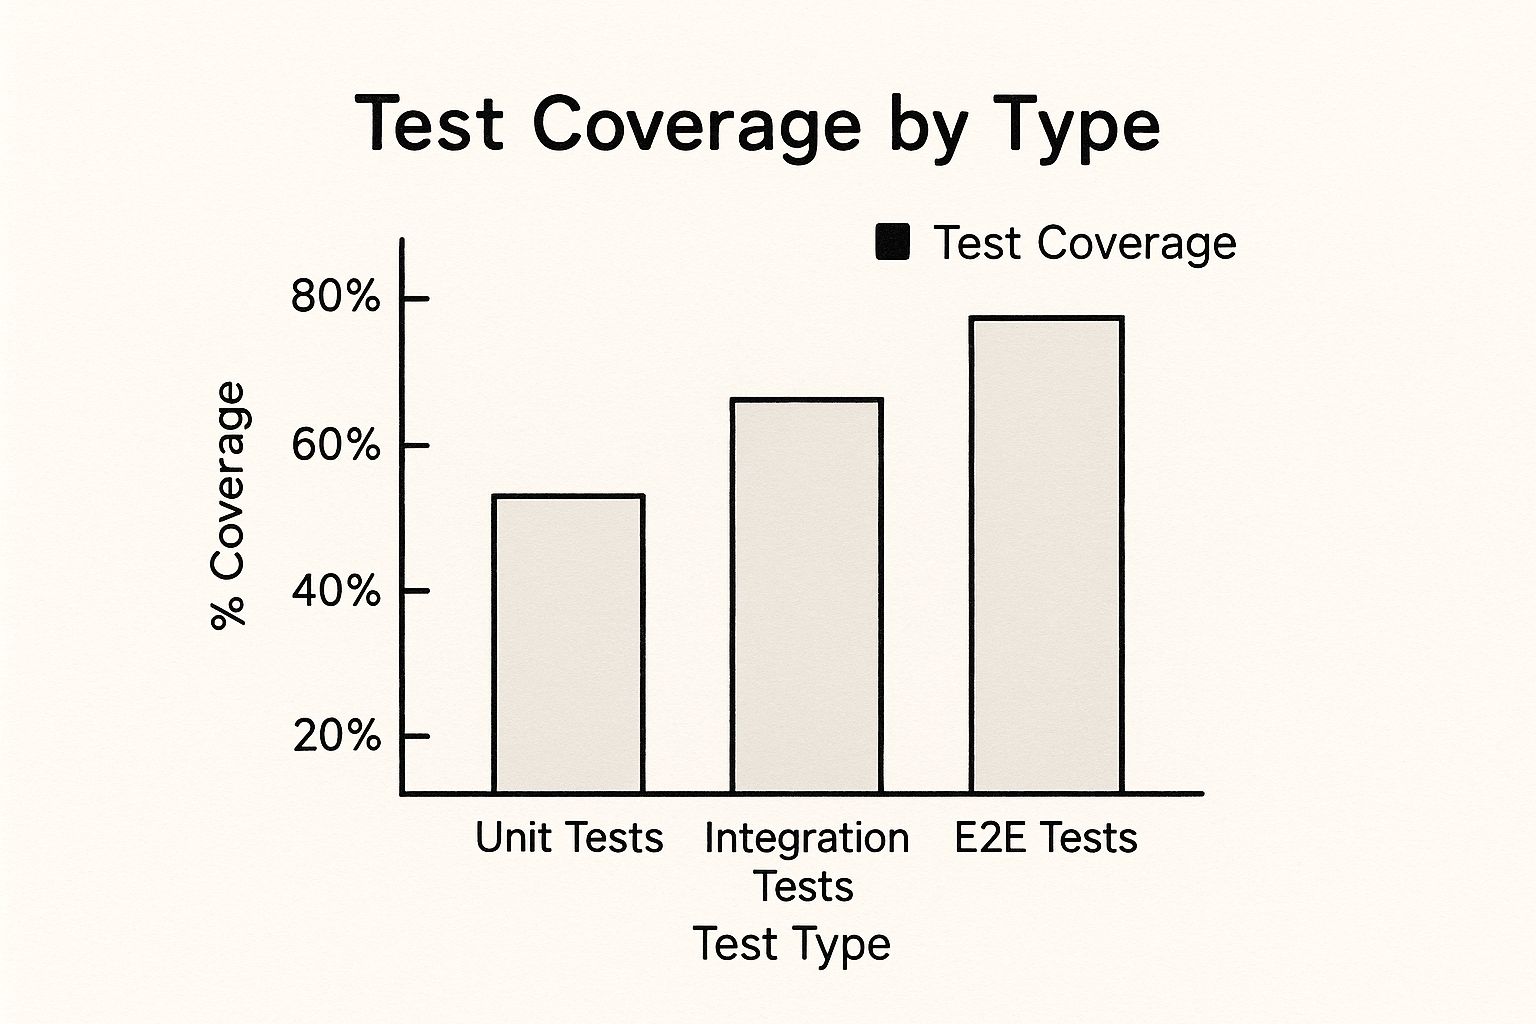
As you can see, while unit and integration tests form the base, it's the E2E tests that give you the highest confidence by making sure the entire application works as expected from start to finish.
Comparing Playwright to Traditional Tools
To really get why so many teams are making the switch, it helps to see a direct comparison. Here’s a quick rundown of where Playwright shines compared to the old guard.
| Playwright vs Traditional E2E Testing Tools | ||
|---|---|---|
| Feature | Playwright | Traditional Frameworks (e.g., Selenium) |
| Architecture | Direct communication with browser engines (no WebDriver) | Relies on external WebDriver for browser control |
| Execution Speed | Very fast due to its modern architecture and parallel execution | Slower, often impacted by network latency and driver overhead |
| Auto-Waits | Built-in, intelligent auto-waiting for elements | Requires manual, explicit waits, leading to flakiness |
| Setup | Simple, unified installation for browsers and drivers | Complex setup, requiring separate driver management for each browser |
| Cross-Browser | True cross-browser support (Chromium, Firefox, WebKit) out of the box | Support can be inconsistent and requires specific driver versions |
| Tooling | Rich tooling included (Codegen, Trace Viewer, Debugging) | Tooling often depends on third-party libraries and integrations |
Playwright was built to solve the problems that modern web development creates—problems that older tools simply weren't designed to handle. For teams that value speed, reliability, and a great developer experience, it’s a clear winner.
Getting Your Playwright Environment Ready
Jumping into a new tool can feel like a chore, but one of Playwright's best features is just how fast you can get a project off the ground. Forget about those complicated setup guides that have you hunting for dependencies for hours. The official command-line interface (CLI) handles everything, letting you get straight to writing tests in minutes.
Honestly, this quick start is a huge confidence booster. It lets you focus on your application's logic instead of wrestling with configurations.
To kick things off, you'll want to initialize a new project right from your terminal. This one command is your entry point to e2e testing with playwright.
npm init playwright@latest
Running this command fires up a slick, interactive setup wizard. It’s incredibly user-friendly and asks a few simple questions to get your project tailored just right. You can choose between TypeScript or JavaScript, decide where your tests should live, and even automatically add a GitHub Actions workflow for CI. This guided process takes all the guesswork out of the equation and makes sure you're starting with best practices from day one.
Understanding the Generated Project Structure
Once the installer works its magic, you'll see that Playwright has created a clean and logical directory structure for you. It’s designed to be intuitive, even if you’re brand new to the framework. The most important file here is playwright.config.ts (or .js), which is basically the central control panel for your entire test suite.
Here’s a quick tour of what you'll find:
playwright.config.ts: This is where you’ll define all your global settings. You can configure target browsers (Chromium, Firefox, WebKit), set test timeouts, define a base URL, and turn on powerful features like the Trace Viewer.tests/: As the name implies, this folder is the home for all your test files. The initializer even drops in anexample.spec.tsfile to give you a working model of a basic test.tests-examples/: For when you need to tackle more complex scenarios, Playwright includes a folder with advanced examples that showcase things like API testing and visual comparisons.package.json: Your project’s manifest file, which now includes@playwright/testas a development dependency.
This organized structure makes it a breeze to manage your tests, especially as your suite starts to grow.
The image above is the official Playwright logo, which really represents the powerful, accessible tooling you're setting up. Its clean design feels like it mirrors the framework's whole philosophy: provide a streamlined, developer-first experience for building rock-solid tests.
Running Your First Test
With the project initialized, all the browser binaries you need are downloaded and ready to go. You don't have to manually install Chrome, Firefox, or WebKit—Playwright takes care of it for you. This is a massive leap forward from older frameworks that made you deal with tedious driver management.
To make sure everything is wired up correctly, you can run the example test that came with the project.
npx playwright test
This command will find all the tests in your tests/ folder and run them against the browsers you configured. You’ll see the output right in your terminal, giving you instant confirmation that your environment for e2e testing with playwright is fully operational.
Key Takeaway: The entire process, from that first command to seeing your first test pass, takes just a few minutes. This rapid start is a deliberate design choice, highlighting Playwright's focus on a great developer experience. You're now set up with a solid foundation, ready to build out your test suite.
Writing Your First Resilient Playwright Test
Okay, with your environment all set up, it's time to get into the fun part: writing tests that are both effective and, more importantly, resilient. The real magic of e2e testing with Playwright isn't just its clean syntax; it’s the philosophy baked into its core. It's built from the ground up to create tests that actually mirror user behavior, sidestepping the flakiness that has plagued so many older testing frameworks.
The key is to start thinking in terms of user actions, not just DOM elements. You're not just telling Playwright to grab an input field; you're instructing it to find that field the same way a human would—by its label, its placeholder text, or its accessibility role. This approach, combined with Playwright’s fantastic auto-waiting capabilities, is what will make your tests incredibly stable.
The Core of a Playwright Test: Locators and Assertions
At the heart of any test are two simple ideas: finding stuff on the page (locators) and checking if it's correct (assertions). Playwright's locators are exceptionally powerful, primarily because they are strict by default. What does that mean? If your locator accidentally matches more than one element on the page, the test will immediately fail. This forces you to be specific.
This strictness is absolutely a feature, not a bug. It saves you from ambiguous tests where you might end up clicking the wrong button by mistake. For instance, instead of using a brittle CSS selector like div > button.primary, you should get into the habit of using a role-based locator:
page.getByRole('button', { name: 'Sign Up' })
This is so much more descriptive and robust. It's resilient to changes in the page's structure because it does exactly what a user does: it looks for a button with the visible text "Sign Up."
Once you've located an element, you need to verify its state. Playwright's expect library is packed with web-first assertions that automatically wait for the right conditions to be met. You'll find yourself using these all the time:
expect(locator).toBeVisible()waits for the element to actually appear.expect(locator).toHaveText()waits for an element to contain specific text.expect(page).toHaveURL()waits for the page's URL to match a pattern.
These assertions are what make your tests so reliable. No more manual sleep() or waitForElement calls; Playwright handles all the timing for you.
Organizing Tests for Clarity and Maintenance
As your test suite grows, a flat list of test files quickly becomes a nightmare to manage. This is where test.describe and test.beforeEach become your best friends. They help you add structure and cut down on a ton of repetitive code.
test.describe is perfect for grouping related tests. For a user registration flow, you could have separate groups for successful registration, tests for invalid email formats, and another for password mismatch errors.
test.describe('User Registration Flow', () => {
// All registration-related tests go here
});
Inside a group, the test.beforeEach hook is a lifesaver. It runs a block of code before every single test in that describe block. It’s the perfect place for repetitive setup actions, like navigating to the registration page.
test.describe('User Registration Flow', () => {
test.beforeEach(async ({ page }) => {
// This runs before each test in this group
await page.goto('/register');
});
test('should allow a user to register with valid credentials', async ({ page }) => {
// Test logic...
});
test('should show an error for an invalid email', async ({ page }) => {
// Test logic...
});
});
This structure keeps your test files clean, readable, and so much easier to maintain down the road.
Putting It All Together: A Registration Form Example
Let's pull these concepts together with a real-world scenario: testing a user registration form. Our test will fill out the form, submit it, and then check that the user is correctly redirected to a welcome page.
import { test, expect } from '@playwright/test';
test.describe('User Registration', () => {
test.beforeEach(async ({ page }) => {
await page.goto('https://myapp.com/register');
});
test('successfully registers a new user', async ({ page }) => {
// Use role locators to find and fill form fields
await page.getByLabel('Full Name').fill('Alex Doe');
await page.getByLabel('Email Address').fill('alex.doe@example.com');
await page.getByLabel('Password').fill('SecurePassword123!');
// Find the button by its role and name and click it
await page.getByRole('button', { name: 'Create Account' }).click();

// Assert the user is redirected and sees a welcome message
await expect(page).toHaveURL('https://myapp.com/welcome');
await expect(page.getByRole('heading', { name: 'Welcome, Alex!' })).toBeVisible();
});
});
This test is incredibly robust because it relies on user-visible information and lets Playwright handle all the tricky waiting logic.
Another key advantage here is Playwright's standout feature: native cross-browser support. This is a huge driver of its adoption. It provides seamless automation across all major browsers—Chromium, Firefox, and WebKit—with a single, consistent API, removing the need for complex, browser-specific configurations. This is absolutely critical for delivering a consistent user experience everywhere. You can discover more about why test engineers choose Playwright and its cross-browser strengths.
Advanced Techniques for Bulletproof Test Suites
Once you've got the hang of writing individual tests, the real challenge begins: building a suite that can scale without becoming a maintenance nightmare. This is exactly where moving from simple scripts to a structured testing framework starts to pay off, big time. When we talk about advanced patterns for e2e testing with Playwright, it's all about one thing: creating code that’s reusable, isolated, and incredibly efficient.
The goal here is to stop writing one-off tests and start building a robust quality assurance asset. These techniques will help you write tests faster and make them more reliable. More importantly, they'll ensure your suite can adapt as your application evolves. It’s the difference between a test suite that feels brittle and one that gives your team genuine confidence.
Tame Complexity with the Page Object Model
As your app grows, you’ll find yourself writing the same interactions over and over again. You click the same buttons, fill the same forms, and navigate the same menus across dozens of tests. A tiny change to a single button can break a huge chunk of your test suite, leaving you with a frustrating and time-consuming repair job.
The Page Object Model (POM) is a design pattern that solves this exact problem.
The idea is simple but powerful. For each page or major component in your application, you create a corresponding class. This class does two things:
- Holds the locators: All the selectors for the elements on that page live here, and only here.
- Exposes user actions: It provides methods that read like user interactions, such as
login(username, password)orsearchFor(term).
Your tests then call methods on these Page Objects instead of interacting directly with the page fixture. If the UI changes, you only have to update the locator in one place—the Page Object—and every test that uses it is instantly fixed.
Think about a login page. Without POM, every test would have this repetitive, brittle code:
// Repetitive code in every test
await page.getByLabel('Email').fill('user@example.com');
await page.getByLabel('Password').fill('secret');
await page.getByRole('button', { name: 'Log In' }).click();
With a LoginPage class, the test becomes cleaner and far more descriptive. It tells you what it's doing, not how it's doing it.
// Clean, readable test using a Page Object
const loginPage = new LoginPage(page);
await loginPage.login('user@example.com', 'secret');
This level of abstraction makes your tests dramatically easier to read and, crucially, to maintain.
Isolate Tests by Mocking API Requests
End-to-end tests often fail for reasons that have nothing to do with your application's code. A flaky backend API, unpredictable network conditions, or a third-party service outage can bring your CI pipeline to a halt. To build truly bulletproof tests, you need to isolate them from these external dependencies.
Playwright’s network interception capabilities are perfect for this.
Using page.route(), you can catch any network request your application makes on the fly. This lets you step in and provide a mocked response, ensuring your test always runs in a stable, predictable environment. This is a game-changer for a few reasons:
- Testing Edge Cases: You can easily simulate server errors (like a 500 response) or weird API payloads without having to manipulate the actual backend.
- Controlling Test Data: Provide a consistent set of data (like a list of products) so your test doesn't break when the real data changes.
- Speeding Up Tests: Fulfill requests instantly instead of waiting for a real network roundtrip.
Here’s a quick look at how you could mock a user data endpoint to guarantee your test always runs with a known user state:
await page.route('**/api/user', async route => {
const mockUserData = { id: 123, name: 'Jane Doe', role: 'admin' };
await route.fulfill({
status: 200,
contentType: 'application/json',
json: mockUserData
});
});
Expert Insight: By mocking API responses, you shift the focus of your test exclusively to the front-end's behavior. This guarantees that a failure is due to a bug in the UI, not a backend hiccup, making debugging far more straightforward.
Speed Up Execution with Authentication State
One of the biggest time-sinks in any test suite is logging in. If every single test has to navigate to the login page, type in credentials, and click a button, you're adding precious seconds to every run. For a large suite, this can easily add up to several wasted minutes.
Playwright offers a brilliant solution: saving and reusing authentication state.
The strategy is to create a single, dedicated setup test that logs in a user just once. After a successful login, it saves the browser context's state—cookies, local storage, everything—to a file.
From then on, all subsequent tests can load this state file at the beginning of their run. This puts them in an already authenticated state, completely bypassing the UI login flow. The impact is huge. We've seen this approach reduce test execution time by as much as 30% in login-heavy applications—a massive gain for any CI pipeline.
Automating Your Tests with CI and Mergify
Your Playwright tests are most valuable when they run automatically on every single code change. This is what turns them into a powerful quality gate, catching bugs before they ever sneak into your main branch. By weaving e2e testing with Playwright into a modern CI/CD pipeline, you transform your test suite from a manual chore into a reliable, automated safety net.
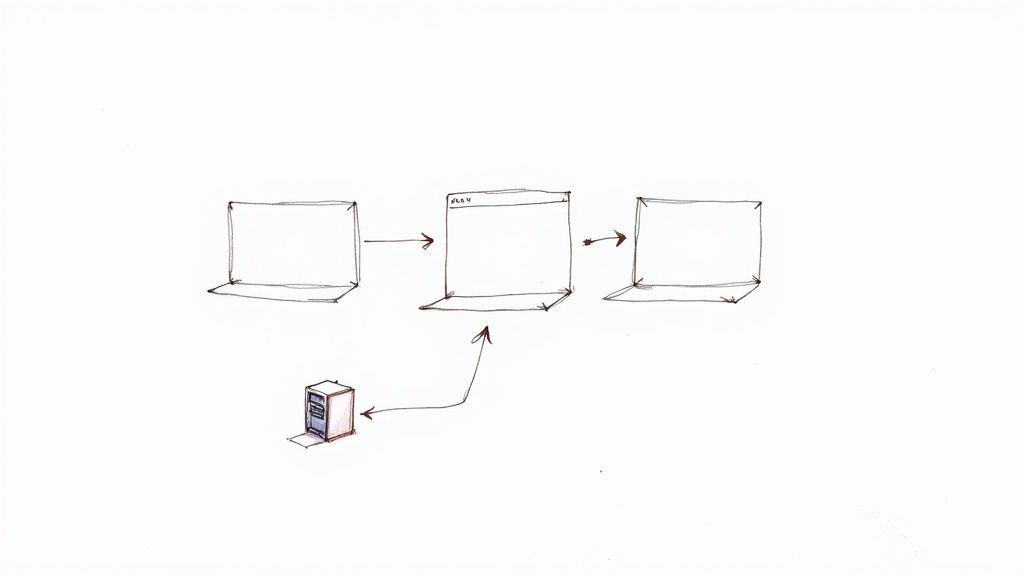
The diagram above gives you a good idea of how an automation tool like Mergify fits into your workflow to protect your codebase. It’s all about making sure every pull request is thoroughly vetted before it gets integrated, which is the key to keeping your main branch healthy and stable.
Playwright makes this shift to automation incredibly effective. It's just plain faster and more reliable than older tools, bringing real productivity gains. Because it communicates directly with browser engines and cuts out external drivers, tests execute much quicker. On top of that, Playwright’s clever auto-waiting mechanism can slash test flakiness by up to 60% by simply waiting for elements to be ready on its own.
Building Your CI Workflow with GitHub Actions
Getting started with CI is probably easier than you think. GitHub Actions offers a straightforward, powerful way to automate your Playwright tests right inside your repository. In fact, when you first set up a Playwright project, the CLI even offers to create a starter playwright.yml workflow file for you.
This workflow file is the recipe for your CI job. A typical setup will:
- Trigger on pull requests: Automatically kick off your tests whenever a developer opens a PR.
- Check out the code: Grab the latest version of your repository.
- Set up Node.js: Install the correct Node.js version your project needs.
- Install dependencies: Run
npm cito get all your project dependencies, including Playwright itself. - Install Playwright browsers: This is a crucial step to make sure the browsers are actually available in the CI environment.
- Run Playwright tests: Execute the full suite using the
npx playwright testcommand.
For bigger or more complex CI/CD setups, learning how to structure your jobs well is a massive time-saver. Getting comfortable with creating reusable GitHub Actions can make a huge difference in streamlining your test automation.
Protecting Your Main Branch with a Merge Queue
A passing CI check on a pull request is a great start, but it doesn’t guarantee your main branch will stay green. What happens if another PR gets merged while your tests are running? Suddenly, your PR is out of date, and merging it could introduce breaking changes. This race condition is a surprisingly common headache.
This is exactly where a merge queue becomes essential. A tool like Mergify creates an automated queue that manages pull requests one by one.
A merge queue protects your main branch by ensuring that every pull request is tested against the absolute latest version of the code before it gets merged. It effectively eliminates the "it worked on my branch" problem for good.
Here’s a quick rundown of how it works:
- A developer submits a pull request, and the initial CI checks pass.
- Instead of merging directly, the PR gets added to the Mergify queue.
- Mergify grabs the PR, updates it with the latest from the main branch, and runs the entire Playwright test suite again.
- Only if these final, up-to-date tests pass is the PR automatically merged.
This process guarantees your main branch is always in a stable, passing state. It builds a ton of confidence in your team and helps create a codebase that's truly ready for deployment at any time. For teams aiming for continuous deployment, this isn't just a nice-to-have; it's a necessity.
To really round out your strategy, it’s worth exploring these key automation testing best practices. When you combine powerful e2e testing with Playwright and an intelligent merge queue, you build a quality system that can scale right alongside your team.
Answering Your Top Playwright Questions
As you get your hands dirty with Playwright, you'll inevitably run into some practical questions. Moving from theory to real-world implementation always does. We've seen a few questions pop up time and time again as teams start using Playwright for their end-to-end testing, so let's tackle them head-on.
How Is Playwright Really Different From Cypress?
This is easily the most common question we hear, and the answer is more than just syntax—it's about their core architecture. If you need a refresher on the basics, our guide on what Playwright testing is is a great place to start.
Cypress works by running inside the browser process alongside your application. This gives it fantastic, intimate access to the DOM, which is why its time-traveling debugger is so powerful. But this approach has trade-offs. It was originally built around a single-process model, which historically made true multi-browser testing and handling multiple tabs more complex.
Playwright, on the other hand, operates outside the browser. It communicates with browser engines like Chromium, WebKit, and Firefox using protocols like WebDriver BiDi or the Chrome DevTools Protocol. This out-of-process design is what unlocks its signature features:
- True Cross-Browser Support: It drives different browser engines natively, delivering far more consistent behavior across the board.
- Multi-Tab & Multi-Context Testing: It effortlessly manages complex user flows that span multiple tabs, windows, or even completely isolated browser sessions.
- Total Control: This architecture lets it automate scenarios that are impossible for in-process frameworks, like seamlessly testing browser extensions or managing file downloads.
The bottom line? Go with Cypress if your main priority is an interactive, all-in-one debugging experience for single-tab apps. Choose Playwright when you need rock-solid, true cross-browser testing, raw speed, and the power to automate complex, multi-context user journeys.
What Is the Best Way to Handle Authentication?
Logging in through the UI for every single test is a huge time-waster. It's inefficient and adds precious seconds—sometimes even minutes—to every CI run. Thankfully, Playwright gives us a much smarter way to handle this.
The most effective strategy is to reuse the authentication state. The idea is simple: you create a single setup test that logs in through the UI just once. After a successful login, you save the browser's state—cookies, local storage, all of it—to a JSON file.
From that point on, all your other tests can simply load this state file when they launch. This puts them in an authenticated state instantly, letting them bypass the login form and get straight to testing the actual features. We’ve seen this one optimization cut test suite run times by 30-40% in apps with complex login flows.
How Do I Actually Debug a Failing Playwright Test?
We've all been there—debugging flaky end-to-end tests can be a real pain. But Playwright’s tooling is some of the best in the business, so you can forget littering your code with console.log and re-running the suite over and over.
Your first stop should always be the Playwright Trace Viewer. When you run tests with the --trace on flag, Playwright records a complete, step-by-step trace of the entire execution. It captures a DOM snapshot, action details, console logs, and network requests for every single moment. You can literally scrub through the timeline to see what the browser saw at the exact moment of failure. It’s like a time machine for your test run.
For live debugging, headed mode (--headed) combined with page.pause() is your best friend. Running a test in headed mode launches a visible browser. When your code hits a page.pause() command, execution freezes and the Playwright Inspector pops up. This gives you an interactive console where you can experiment with locators and commands on the live page, helping you figure out exactly why a selector isn't working.
Ready to ensure your main branch is always protected and your test suite runs efficiently? Mergify's merge queue guarantees that every pull request is tested against the latest code before merging, eliminating broken builds and keeping your team moving forward. See how it works at https://mergify.com.